As the name implies, a freight yard is where cargo is loaded onto, and unloaded from, rolling stock. In the real world, a freight yard is a complex entity consisting of cranes, marshalling/classification yards, goods stations, container storage, and so on. While many of these elements can be modeled in the BRIO universe, some simplification is necessary at the very least so that the layout will fit in a reasonable amount of space.
Yard Configuration
The first consideration is whether to model the freight yard as a stub yard or a through yard, as the yard configuration and the loading equipment are heavily intertwined.
Stationary Equipment: Through Yards
If the loading equipment is fixed then it is up to the train to move so that each car can be loaded or unloaded, and the yard should be modeled as a through yard. Stationary equipment would include accessories such as:
- 3324 / 31405-37 Hopper
- 33242 Tower Crane
- 33244 Sliding Container Crane
- 33245 Low Level Crane
- 33324 Push and Load Tower
- 33325 Dockside Crane Depot/Loading Dock and Crane
- 33327 Crane
- 33380 Harbour Crane
- 33386 Overhead Crane
- 33552 Fuel Tank Station
- 33554 Crane and Funnel Load
Because of the size of many of these accessories, some of which have a large footprint and even an integrated base, the through yard will need to make sufficient space for both the equipment and any supporting vehicles. There are several options for incorporating a freight yard into a design based on the basic loops.
One approach is to simply make the inner loop into the freight yard. This works well for smaller layouts, such as those based on two 36″ card tables. The inner loop can be shortened in order to make more room for non-industrial accessories such as a town.
A second approach is to place the freight yard at one end of the outer loop.
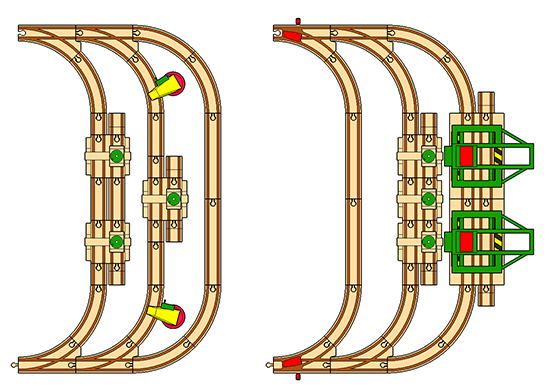
In the left configuration, the main line is the outer-most track and the yard is comprised of the two short circuits. It’s show here with three #33386 Overhead Cranes and two #33327 Cranes as the yard elements with plenty of space left for vehicles to enter and exit.
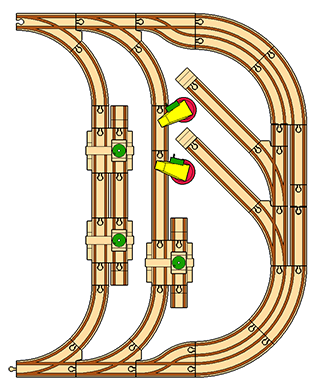
In the right configuration, the shorter route is actually the main line and the outer branches are the freight yard. Trains should not enter into yards by default, so use the mechanical switches L1 and M1 to force the them to follow the curved path without requiring any special handling. This configuration is well suited to modeling shipyards. Shown here are three #33386 Overhead Cranes, and two #33244 Sliding Container Cranes.
A third approach for the freight yard is to create a dedicated loop near one end of your outer loop.
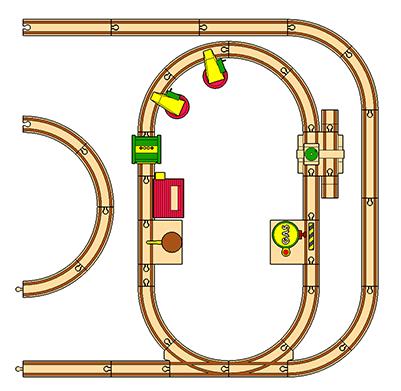
You’ll need to shorten your inner loop to make room for this “end loop”, of course. This special loop becomes its own self-contained freight yard that does not interfere with the rest of your layout, and is well suited to holding numerous accessories with unusual footprints. If needed, you can use gender changers to orient accessories such that their bulky structures are on the loop’s interior. Shown above are the #33667 Water Tower, #33324 Push and Load Tower, #3324 Hopper, two #33327 Cranes, #33386 Overhead Crane, and #33552 Fuel Tank Station.
Moving Equipment: Stub Yards or Through Yards
If the loading equipment can move, then the train does not have to and either a stub yard or a through yard configuration will work. Moving equipment typically implies a rolling gantry crane, such as the vintage #33323 or the more recent #33732, but any rolling vehicle with a crane can serve this purpose. And even one or more fixed cranes can service a stub yard if they can cover enough cars.
The resulting stub yard can serve a dual role as both a classification yard and freight terminal.
Receiving Yards
No matter which yard configuration you have chosen, you might want to consider adding a receiving yard. As a reminder, receiving yards are where arriving trains are broken down by switching engines, and departing trains are similarly assembled. A receiving yard is basically a siding connected to the main line at both ends, and are most easily constructed using parallel or straight switches (F, F1, F2, G, G1 and G2) since they keep the main line and the siding synchronized in length.
In the simplified world of BRIO, receiving yards probably make the most sense in a stub-type freight yard, but they can work for either configuration.
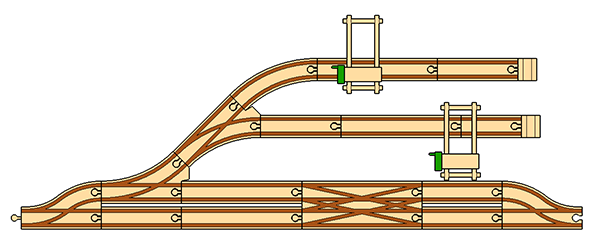
Here, we have a stub yard with two freight terminals and a receiving yard implemented using F2 and G2, with a K switching and crossing track thrown in.
Implementing an arrival yard into a through yard is not much different, though doing so in a yard placed at the ends of the outer loop is a job for double curved track.
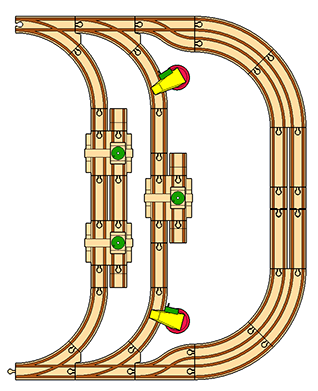
The space in the middle can be used for buildings or other accessories, or it can be filled with track to form a more complex yard with multiple elements.
This configuration includes freight terminals, a classification yard and a receiving yard, and still leaves some space for buildings and other accessories.
Putting it all together
Here’s a full layout, made on an 8′ x 3′ table, that models one large freight yard, and a smaller ship yard. The main freight yard has a classification yard, engine shed to house a switching engine or two, a receiving yard, and a through yard with overhead cranes and a hopper. A roudhouse provides storage for engines. At the other end is a small shipyard, also modeled as a through yard with a sliding container crane for loading and unloading barges and container ships.
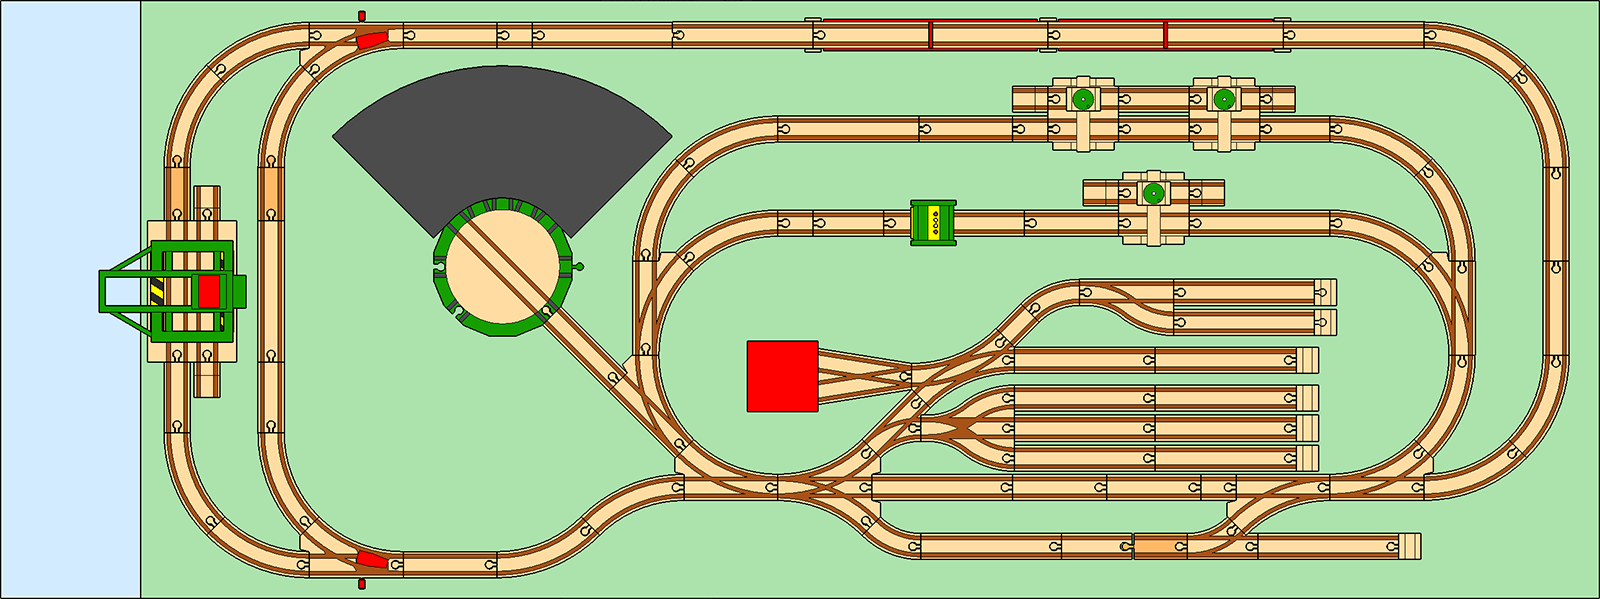
(Click to enlarge.)
This layout does not make use of the basic loops because of the yard size and complexity, and involves a number of specialty pieces including some of the Maxim 3″ straights.