Step-by-step: Restoring the Blue Steam Engine

This is a record of the steps I followed to do a complete, major restoration of a #33429 Blue Steam Engine. This is one of BRIO’s rarest pieces, only showing up in one wooden railway catalog from the year 1993. It’s not clear why it had such a short production run but the best guess is that it was essentially parts re-use, a way to use up the engine bodies from the #33414 Steam Engine which had two pieces, the main body and a separate coal tender. Whatever the reason, though, this engine had a very short production run and from monitoring eBay off and on from 2000 through 2015 I have only seen three of them, and all three were in bad shape.

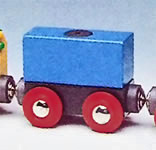
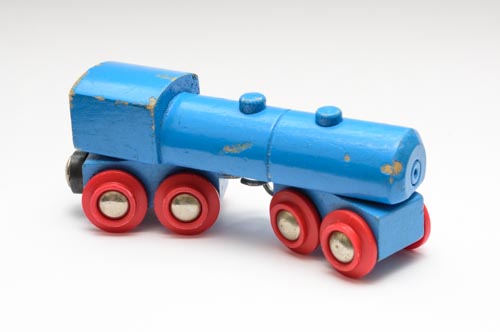
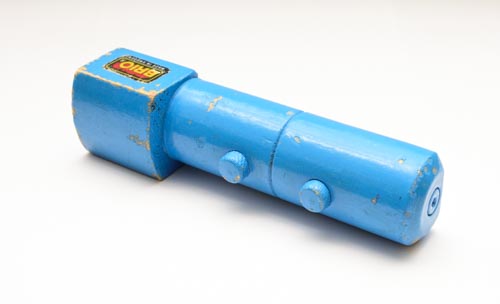
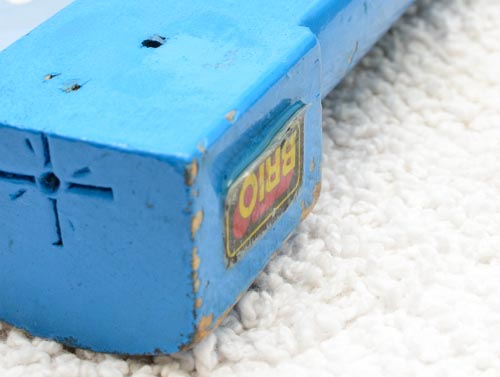
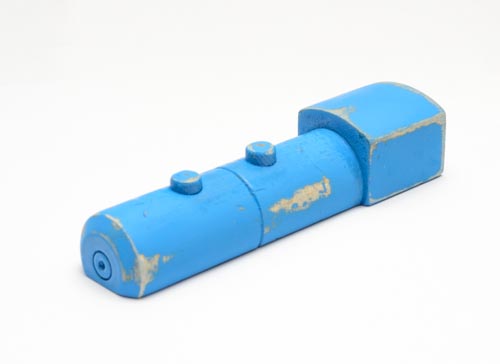
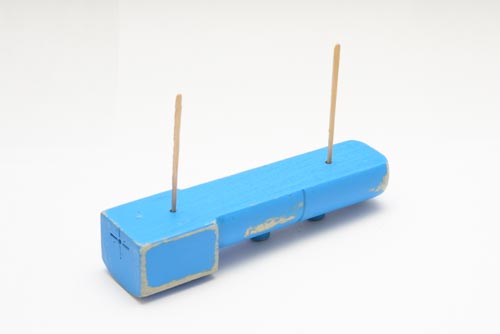
This is what my engine looked like when I purchased it as part of a lot:

Step 1. Assessment

The first step of the restoration was to assess the condition of the engine and work out what repairs would be needed. In this case, the damage appears to be mostly to the paint, sticker and wheels, but there were also a few dents in the wood as well as some wear along the edges. It was also not clear at first whether some of the larger paint chips were also gouges in the wood itself.

I decided right away that I was not going to try and repair actual wood damage unless it was severe. Any dents or dings would simply look like wear associated with normal play. That meant my restoration would be limited to the following:

  • light sanding and repainting in the original color
  • replacing the wheel assemblies
  • replacing the sticker
  • polishing the metal hooks that link the undercarriages

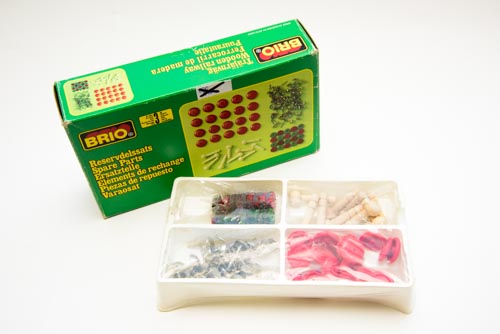
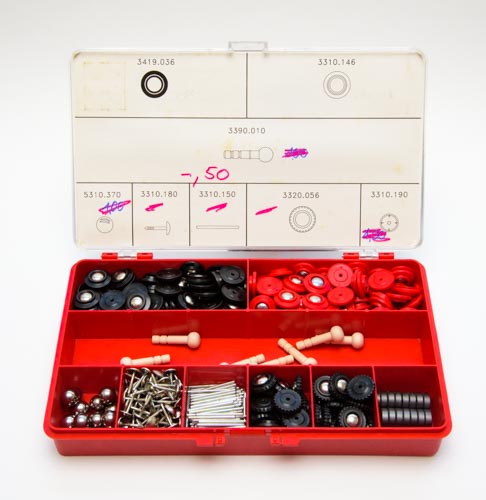
Replacing the wheel assemblies meant that I needed genuine BRIO replacement parts, from the #33393 Spare Parts kit. This kit is exceedingly rare, but some parts from the kit are sold individually on eBay.

Step 2. Disassembly

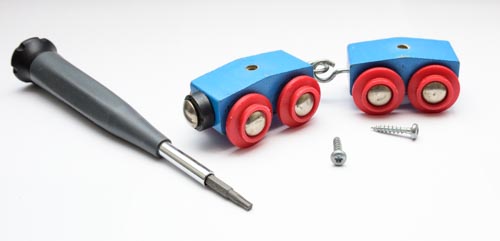
The second step was to disassemble the engine into its individual components. The undercarriages were fastened with Torx screws, the star-shaped screw heads designed to prevent cam-out that leads to stripped screws.

With the undercarriage removed, I also was able to get a look at the underside of the main engine body.

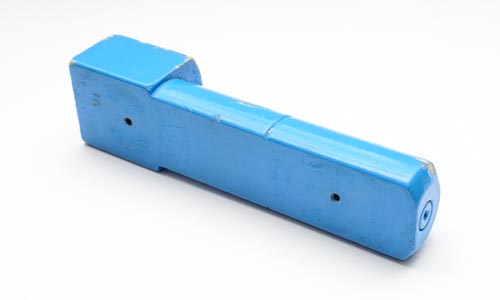
With the underside not really visible, and not showing significant wear, I determined that it would need very little work: only one or two mist coats of paint would be enough to give it a consistent gloss with the rest of the engine body.

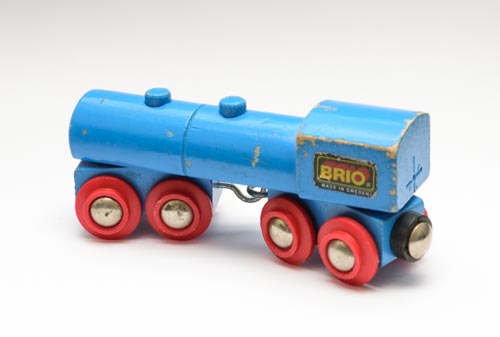
Step 3. Sticker removal

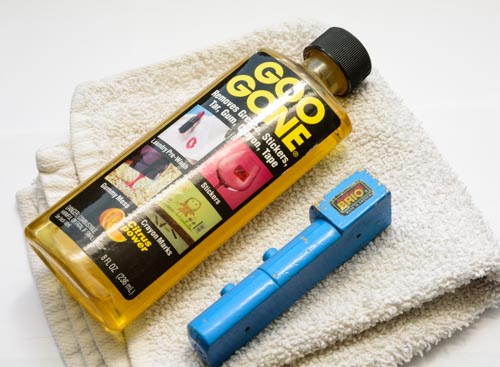
My goal was to replace this sticker with an identical sticker from another, used part that was in my “spare parts” bin. I practiced my technique of safe sticker removal on the old engine, first, just to make sure it would work.

To remove a sticker, I placed a few drops of Goo Gone, a mild adhesive removal solvent, directly onto the sticker and let it sit. This solvent is not powerful enough to damage the lacquer paint, and the stickers themselves are a die-cut plastic.

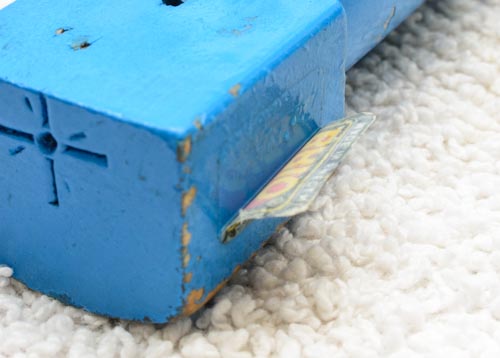
After letting the Goo Gone sit for a minute, I dabbed it up with a tissue. Note that it is important that to dab and not rub. Then, I slipped a straight razor blade, such as the type used in box cutters, under the corner of the sticker very carefully to separate it from the paint surface.

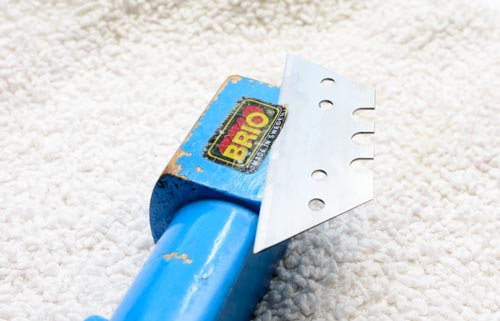
The Goo Gone had dissolved the adhesive along the edge of the sticker enough to lift away just the very edge of the sticker. Now I turned the engine on its back and put a few drops of Goo Gone into the gap between the sticker and the paint and let it sit for about 30 seconds.

This let the Goo Gone work on more of the adhesive, with gravity holding it in place. After about 30 seconds, I slowly started peeling the sticker away, letting the Goo Gone work its way down the sticker as I went.

Eventually, all the adhesive was dissolved and the sticker came off completely. I then stashed the sticker on a acetate sheet for safe keeping. The rest of the Goo Gone was dabbed up with a towel.

Step 4. Sanding

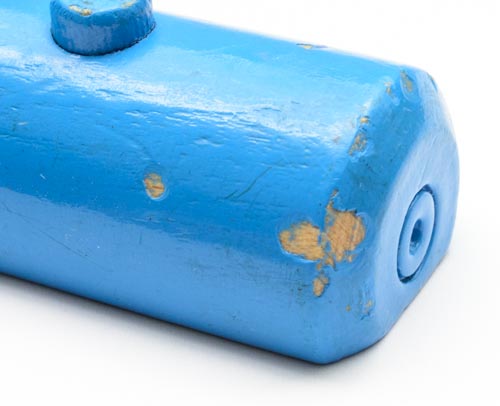
With the sticker removed all that was left was to sand down the main body and prep it for painting. Because several of the paint chips went all the way down to the wood, such as the one shown below, I had to decide whether to sand the entire engine body down to the wood, or just sand the paint down around the chipped areas and feather it smoothly with the rest of the body as best as I could.

Because of the awkward shape of the engine body, I chose to do the latter: just sand the chipped areas down and feather them out. For sanding I choose sheets of 400 grit sandpaper and worked very slowly. Using such a fine grit lessened my chances of actually removing a large amount of the wood below the paint or rounding the sharp corners of the engine cab. The sanding process took by far the most time.

I also made sure that all of the old paint was at least lightly sanded in order to improve adhesion to the new paint layers.

Step 5. Painting the engine body

Before painting, I placed toothpicks in the screw holes on the underside. This not only prevented paint from getting in them, but it also provided a convenient stand for the engine during painting. I used a large Styrofoam block as the base, and stuck the toothpicks in it to prop up the engine.

Painting was done using the Tamiya TS-10 French Blue spray lacquer, a synthetic lacquer spray that is an almost-perfect match for the original BRIO light blue.

Because of the amount of bare wood that would need to be painted, I started with just two very light coats of the Tamiya paint (one pass in each direction, on all sides) and let it dry for 30 minutes. I then repeated with two more very light coats, applied the same way, and let this dry over night. These first layers of paint served as my primer.

The following day I laid down the main color coats, using the same basic technique. It took about a dozen passes on each side to achieve the right color depth and to even out the appearance between regions that started as bare wood and sanded paint. I then let the color coat dry over night.

The next day, I used a wet sanding technique with 1500 grit sandpaper to smooth out the paint layer, removing any “orange peel” in the coat as well as some bits of dust that had lodged themselves into the paint while drying. To wet sand, I soaked the paper in water and added a tiny amount of liquid soap to serve as a lubricant. The entire surface of the engine was sanded lightly, then rinsed and toweled dry.

I then applied four more color coats to serve as the final paint layers and allowed the part to dry.

Step 6. Removing wheels and magnet

Because the Tamiya paint has such a high-gloss finish, it was clear that the undercarriages would have to receive a coat or two of the new paint so that the finishes would match. This meant that I had to remove not only the wheels as originally intended, but the magnet as well.

Removing the wheels is difficult because the single-axle wheel assembly is not meant to be removed, and doing so is a destructive process: once they are taken off, they cannot be reused. The best way to remove the wheels is to pop one of the hubs off of the axle.

To remove a hub, I first had to “pop” one out of the rimmed wheel. I placed my thumb on one wheel and index finger on the opposite wheel, and “pinched” the wheels together. This pressure was enough to force one of the hubs out of the wheel, at which point I could use a small, flat-head screwdriver as a pry-bar to lift the hub off the axle enough to grab it with a pair of pliers. After pulling the hub off, the wheel axle was easily removed.

Removing the magnet was also challenging because it is held in place with a nail that is ribbed along it’s shaft. I opted not to try and “save” the nail or magnet, and used pliers to pull them out. These would be replaced with fresh, replacement parts.

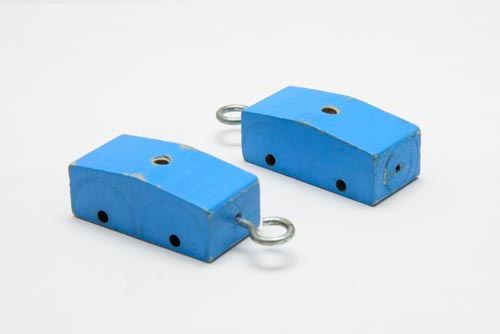
Step 7. Sanding the undercarriage

There was not any significant paint wear on the undercarriage, but there was some dirt buildup and the new paint layer would need a prepped surface to improve adhesion so some sanding was in order. I used the 400 grit sandpaper to very lightly sand all the surfaces.

Step 8. Polishing the hooks

I chose to polish the hooks with a metal polish before painting, as I didn’t want the abrasives to damage the new paint finish. This was done using a liquid metal polish.

Step 9. Painting the undercarriage

Painting the undercarriages was easy since I was just laying a thin color coat on top of the existing, sanded color coat. Just four passes on all sides was sufficient to give them the right glossy appearance. This was allowed to dry over night.

Step 10. Reassembly

With the paint dry enough for handling, I gathered the replacement parts together and reassembled the engine.

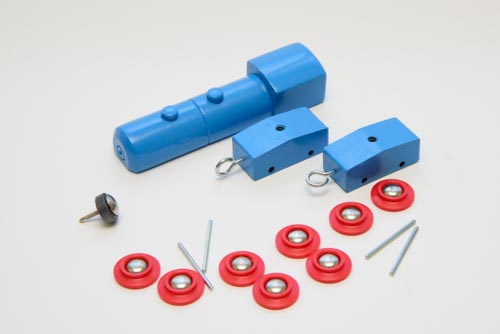
I put the replacement magnet on first since that required the most force. Then I put on the wheel assemblies one at a time. This was accomplished by placing the axle through the hole in the undercarriage, putting a wheel at each end and then squeezing the opposing hubs to snap them onto the shaft.

With the carriages assembled, all that was left was to attach them onto the engine body.

Step 11. Replacing the sticker

Since the Goo Gone dissolved the adhesive on the sticker during the removal process, the replacement sticker did not have sufficient adhesive to stick to the train body. To give it some fresh adhesive, I used a spray adhesive to spray a small amount onto a scrap piece of plastic, and a small brush to brush a very thin layer of fresh adhesive onto the back of the sticker. I then carefully applied the new sticker to the engine and let it set.
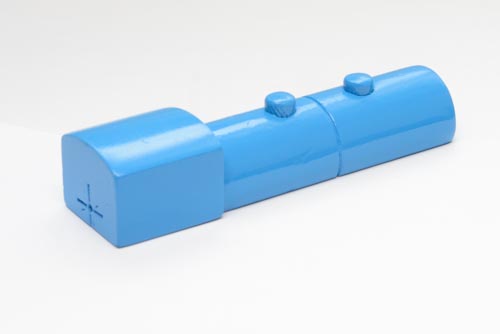
Step 12. Finis!

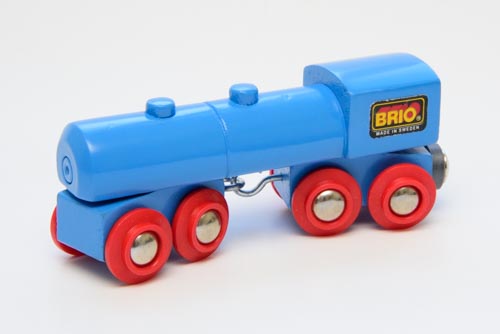
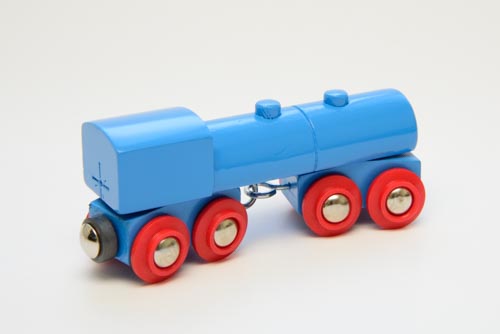
And here it is, the completely restored #33429 Blue Steam Engine!

Restoration Advice and Resources

Here’s some advice and resources on techniques and materials for those who are interested in attempting minor or major restoration on a BRIO toy. Note that not all problems have solutions so in some cases the advice is “you’re out of luck”.

Paints

Plastic

Wood

Commercial lacquer paints that match BRIO colors

Finding a lacquer paint that closely matches the color of the original is not an easy task, but there are some commercially available paints that are excellent substitutes for many of the vintage BRIO colors. While these are not all perfect, there have been enough variations in BRIO’s color tones over the years that they are very good fits.

Suggested matches for BRIO paints
Color Reference Image Recommended Commercial Paint
Black
White
Rust-Oleum Lacquer Spray, in Black or White

(Note that this can generally be purchased at home improvement stores for a lot less money than from online retailers)

Blue Tamiya TS-10 French Blue Spray Lacquer
Green Tamiya TS-35 Park Green Spray Lacquer
Yellow Tamiya TS-35 Park Green Spray Lacquer

I have yet to find an acceptable match for the BRIO red. This color has shown the least variation in their products over the years so finding an appropriate replacement has been a real challenge. Red is used on most of BRIO’s roofs so any mismatches really stand out.

Note that all of these lacquers are synthetic lacquers. The Testors and Tamiya paints in particular are designed for use on plastic models (true lacquers require more powerful solvents that are chemically hot enough to melt plastic). Don’t apply a “true” lacquer clear coat over a synthetic lacquer, or you run the risk of cracking the pigment layer.

Applying lacquer spray paint

Each brand of lacquer spray has different properties and thus applies somewhat differently, so you’ll want to experiment with a scrap piece to get a feel for how your particular paint behaves. In general, though, you want to apply several very thin coats, with plenty of time between coats for the paint to dry and the solvents to evaporate. You won’t reach full color saturation from the first few coats, so be patient!

I find that the Tamiya paints tend to be on the thin side while the Testors paints are much thicker. The Rust-Oleum paint is somewhere in between.

Tamiya USA offers excellent advice on how to apply their lacquer paints, and much of what is written there applies to lacquer sprays in general.

Both the Rust-Oleum and Taimiya paints are a one-step system, meaning you do not need to finish with a clear coat.

Testors Model Master spray paints are a two-step system. Once the final color coats has dried, you must apply a clear coat within about 24 hours so that it can bond with the pigment layer. If you don’t apply the clear coat you won’t have the proper surface hardness or gloss. If you forget to apply the clearcoat in time, simply lightly sand the color coat, spray a thin layer of the color on, and then apply the clear coat.

Make sure you allow ample time for each coat to dry before applying the next. This is particularly important for the Tamiya and Rust-Oleum paints which go on fairly thin. The first coats, especially, need to dry until they are no longer tacky because they will serve as your primer coat. Spray the next coat too soon and you are just adding more solvent to the existing layer of uncured paint and you’ll get a thin, runny layer instead of a nice buildup of color. I find it best to apply the first two coats as two passes, one in each direction, and then let the paint dry for a good 30 minutes to an hour depending on humidity and temperature.

Note that BRIO parts are small relative to the spray pattern from these paints. You might be tempted to hold the spray can closer than the recommended 10-12 inches. Don’t. This will lead to a very thick application of runny, thin paint and you’ll almost certainly end up with a very wet coat that takes hours to dry, and runs and drips that will need to be sanded down. Hold the can at the recommended distance and work in even strokes. You’re going to end up painting your dropcloth or backsplash as much as, if not more than, your BRIO part. Just accept that you’ll be wasting paint in this process.

All of these paints should be allowed to hard cure for 30 days so that the solvents can completely evaporate. This is particularly impoertant if the toy is going to be handled by small children.

Removing stress lines from plastic

You can use a heat gun, such as the kind used for embossing in craft projects, to remove the stress lines that form in plastic that has been severely bent.  Hold your heat gun a few inches from the plastic and turn it on. Heat the plastic surface gently, watching the surface carefully. You want the plastic to get warm enough that the surface becomes shiny and the plastic softens but does not melt. The stress lines should start disappearing before your eyes.

Be very careful not to melt the plastic. You may need to back off and let the part cool down for a while and then return to it if the damaged area is very large or the stress lines are particularly deep. Also be careful not to deform your piece. Getting it warm enough to remove these lines also makes it soft enough to bend and warp. Handle your part with care until it cools down.

Here’s a three-minute video that shows the technique in action on a #33382 Windmill, an accessory that is infamous for its bent sails. The stress lines start vanishing at 1:45.

Here’s the before image from the video:

And the after:

Fabricating plastic parts

This is one area where you are almost certainly out of luck, and your best bet is to salvage the parts you need from another damaged or worn toy.

Theoretically, 3-D printers make it possible to replace broken or missing plastic parts but the idea is far less practical than you might think. Assuming you can solve the problem of modeling the part you need in CAD software, there is a big difference between high-temperature injection-molded plastic and the layer-by-layer bonding technique used in printing. For one, the former is significantly more durable as it has even stength throughout the part, while the latter has laminate weakness between layers. A typical consumer 3-D printer also produces parts with a rough finish that requires post-processing with chemicals that can degrade the details on the part. Last, there is the matter of color-matching, which is next to impossible. Most printers have a limited set of spools in a fixed range of colors, and finding one that matches the dye used in the original, molded part is an unrealistic goal unless it is white or black.

So, while 3-D printing looks attractive, it’s really only a “last resort” option, and any 3-D printed replacement parts almost certainly should not be sold.

There are home injection molding machines that make it possible for the hobbyiest to create true, molded plastic parts. If you have access to a CNC milling machine and the technical ability to make a mold, and you can solve the color problem. then you could conceivably fabricate a replacement plastic part yourself. The cost, of course, would be significant since you would be building a one-time-use mold from some very specialized equipment.

Removing dents from wood

You can remove dents from wood by steaming them out. Just add a drop of water to the dent, cover it with a rag, and use an iron to create some steam. Note that this may be very difficult to do on small BRIO parts, so be careful not to burn yourself. If the part cannot be stabilized in some manner, you should not try this method.

Note that you might need to sand the surface to smooth it out after it dries.

Restoration: An Introduction

Restoring an old BRIO piece or set, or any vintage or antique toy for that matter, is a fairly controversial topic and you’ll find little agreement among toy collectors about how much restoration work is considered proper, and what impact it will have on the toy’s value. And the more intrusive and potentially risky the work being done, the more controversial it is.

That being said, some restorations are low- or no-risk and result in an original toy with all original components. Done properly, this can result in a part or set that is in better condition that it was originally and that almost always translates to greater sale value. It’s the most advanced type of restoration work, where you are permanently altering original parts, that carries the greatest risk.

I think of restoration work as falling into one of three broad categories depending on the intrusiveness of the work being done, and I describe each below.

Trivial Restorations

A trivial restoration is one that carries no real risk to the piece or set, and does not require any tools.

Typical examples of a trivial restoration would be taking the best parts from two or more sets in order to create one complete set in the best possible condition, using two partial sets to build one complete one, and simple cleaning of parts with a damp rag.

The primary issues with building a set from one or more others are that you must ensure that replacement parts really are identical to the ones being replaced, and that the styling and finish match the other pieces in the set. The latter is a particularly important detail because BRIO was not always consistent in applying gloss finishes or varnish to its parts and you don’t want to mix glossy pieces with matte pieces, or varnished wood with unvarnished wood, in the same set. Similarly, you also need to ensure that the paint hue and varnish tints are consistent, as some ofBRIO’s lacquers did have minor color variations and some of their varnishes did yellow more than others with age.

The basic rule is that all the pieces in the final set should look like they belong together. They should have roughly the same color tone, finish and wear.

You do not need to disclose this sort of restoration work if you coose to sell the restored part or set, but of course the condition that you advertise should be lowest common denominator. If you use a used part to replace a missing one in a new set, then you can’t really claim that the set is new.

Minor Restorations

A minor restoration is one that involves user-replaceable components, or components that can be easily scavenged from identical pieces, and cleaning with a mild detergent solution or solvent. There is typically some risk involved in this type of restoration because detergents and solvents can potentially damage paint finishes and stickers, and some disassembly of the toy may be required and that process can damage it–particularly if the components are held together with non-removable or tamper-proof fasteners, or with permanent adhesives.

The most common reasons for a simple restoration are to remove pencil and ink marks from wood or paint, fix a broken piece, or replace a particularly worn component with one that is in better condition.

As with trivial restorations, you must take care to ensure that your replacement part matches the original in styling, color tone, and finish.

Typically, when you are doing this level of restoration you are not making alterations to the original part, merely replacing worn, damaged or broken parts with manufacturer-original replacements. BRIO even produced repair kits for this exact purpose. In the early 70’s, replacement magnets, plugs for male track connectors, and wheel axels for the rimless wheels were sold separately. In the early 1980’s, they were all combined into a single kit and sold as the #33392 Spare Parts accessory.

BRIO even produced a repair kit for the single-axel, rimmed wheels that debuted in 1986. This kit included magnets, nails, rimmed-wheel axels, red and black wheels for trains, and black treaded tires for vehicles (it also included spare balls for the labyrinth games). This kit appears to have only been sold in Europe.

As with trivial restorations, you do not need to disclose this sort of restoration work so long as you are only using original BRIO parts, either from a repair kit or salvaged from another original BRIO toy.

Major Restorations

Major restorations are the most controversial because they involve permanently altering the original part, or fabricating replacement parts from scratch. While every collector probably has his or her own opinion as to whether or not this sort of action ruins a toy, one thing they will all agree on is that you absolutely must indicate that the toy has been restored if and when you choose to sell itThere are no exceptions to this rule. You need to clearly indicate what work was done, what the source of any replacement parts was, and most importantly, what paints were used–specifically the paint brand, type, and color–so that they can be checked for safety (it should go without saying that you should never use lead-based paints, especially on toys).

Should you do major restoration work? Some collectors prefer that classic or antique toys remain in their original condition even if heavily worn, but some buyers really appreciate the almost-new look of one that has been properly restored. So before you go grab your wood putty and paint supplies, consider what impact your actions might have on its value. If you are restoring a BRIO piece just for your own collection, then of course you have little to lose save for the risks of damage to the piece itself. But if your goal is to try and increase its resale value on the used market, keep in mind that your restoration efforts may have the opposite effect of what you are trying to achieve, even before you figure in the cost of your supplies.

Also keep in mind that using modern chemicals (solvents, paints, etc.) to restore a toy may actually cause long term damage to other parts of it. So major restoration work is not just risky from a financial perspective, it is potentially risky for the toy. Even experts working in museums occasionally make decisions that turn out to be wrong causing damage that is not noticed for several years.

Some examples of major restoration include:

  • fabricating replacement parts
  • sanding wood with coarse-grit paper (this removes the original finish, if any, and also changes the thickness)
  • using harsh solvents to remove stubborn stains and mystery substances
  • using polishing agents to restore the shine to metal components
  • repainting or refinishing
  • altering one part to match the styling of another
  • removing dried glue applied by a previous owner

Sometimes the damage to the toy is so severe that you have nothing to lose except maybe your time and some money.

Some ground rules for major restoration work

Even if you don’t plan on reselling your restored BRIO part, you should still follow these basic rules for restoration. If you are going to do it, you should do it right! And besides, you may decide to sell your collection some day and a properly restored part is going to fare better than one that was sloppily done. You also don’t want to create confusion in the collector market by advertising a toy with mix-and-match components as being a valid, original configuration.

  1. Take pictures of your BRIO toy before you begin. Document, photographically, all important details such as painted surfaces, colors, sticker types and locations (repainting almost always means removing or destroying a sticker), and so on. Save this documentation in printed form and store it with your toy, or somewhere nearby so that you can find it later.
  2. Document, in writing, everything that you did to restore the toy including any intermediate steps. As with #1, store a hardcopy with or near your BRIO toy.
  3. Reproduce the original part or finish as closely as possible. Work from photographs or a copy of the original part to ensure accuracy.
  4. The final toy should have roughly the same condition and wear overall, so if you are going to restore any part of the toy you should commit to restoring the entire piece or set. It makes no sense to have shiny new wheel hubs on a worn and tattered train. A partially restored toy generally looks worse than a worn toy.
  5. As with other restorations, pay close attention to details such as fasteners, stickers, clear coats and color tone. Your completed part should blend in with the rest of the set.
  6. When fabricating wooden parts use the same wood as the original toy, which for almost all BRIO components means using beechwood. If you don’t have beechwood or access to it, sacrifice a part that you don’t need and use it for raw materials.
  7. Use lacquer spray paints for painting wooden parts to best reproduce the finish of the original BRIO lacquer paints. This generally means resorting to the synthetic lacquer sprays used by plastic model hobbyists and sold in home improvement stores since true lacquer paints require powerful solvents that make them impractical and even dangerous to thin and spray by the layperson. True lacquer sprays are also expensive and only come in a limited range of colors.

Restoration advice and resources

The article Restoration Advice and Resources outlines some advice, techniques and additional resources that will be of assistance to you if you plan to take on a minor or major restoration project. You can also read the restoration section of the blog for additional articles of interest as well as examples of my own restoration work.