Removing stress lines from plastic parts

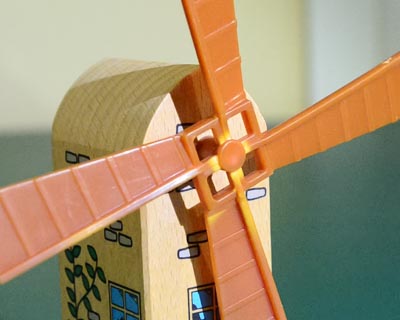
In general plastic is pretty durable, but some BRIO accessories have large plastic parts that are easily damaged. Good examples of this are the BRIO #33382 Windmill and the Thomas the Tank Engine and Friends #32481 Windmill: their large, plastic sails are quite delicate and easily bent, not just with handling but also in storage because of their awkward shape and lack of support. When plastic bends or is stressed severely enough it lightens in color, creating unsightly lines where the damage occurred.

These stress lines can be partially, or even entirely, removed from the surface of the plastic using heat, and the following video shows the technique employed on a #33382 Windmill. Here’s the before image:
And the after:
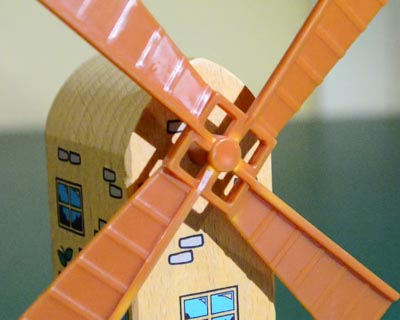
If you don’t want to watch the whole three-and-a-half minute video and just want to see the proof that it works, the changes start happening around around 1:45.

Here’s the basic approach. To do this you will need a small heat gun such as the kind used for embossing in crafting projects. A hair drier shoould work as well, but they don’t get as hot so it will take longer. Hold your heat gun a few inches from the plastic and turn it on. Heat the plastic surface gently, watching the surface carefully. You want the plastic to get warm enough that the surface becomes shiny and the plastic softens but does not melt. The stress lines should start disappearing before your eyes.

Be very careful not to melt the plastic. You may need to back off and let the part cool down for a while and then return to it if the damaged area is very large or the stress lines are particularly deep.

Also be careful not to deform your piece. Getting it warm enough to remove these lines also makes it soft enough to bend and warp. Handle your part with care until it cools down.
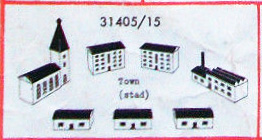
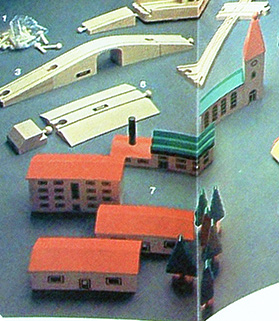
The Town set through the years

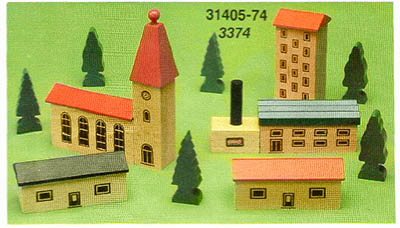
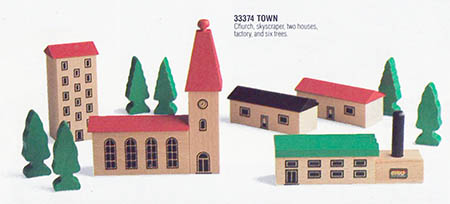
The Town set is one of BRIO’s oldest and most venerable wooden railway accessories. First introduced in the early 1960’s, the Town saw production through 1991 with only modest styling changes, giving it a roughly 30-year history.

The first known catalog appearance was around 1964, and the set originally consisted of three houses, two skyscrapers, a church and a factory. The skyscrapers were wide, and the factory was a single building with two roofs. The factory smokestack was a skinny, smooth dowel 9mm in diameter and 55mm long.

As the catalog pages from this time are all black-and-white drawings, it’s not known what color the roofs were but surviving pieces from this time, and a catalog sheet excerpt from the 1970’s, suggest that the houses and skyscrapers all had red roofs, the church had a green roof and red steeple, and the larger factory roof was green while the smaller roof was red. Curiously, the church and the skyscrapers were also double-sided, meaning the graphics for the windows were printed on both sides.

By the early 1970’s, the Town had lost the double-sided printing, one of the skyscrapers and one of the houses, but gained six trees. These early trees differed from the tree style that would emerge in the 1980’s in that they had a round, brown base.

Sometime around 1980, the Town set underwent a major styling change: the skyscraper was replaced with a much narrower building, the factory was split into two pieces and lost the smaller roof, the smokestack grew to a 12mm diameter and 60mm length, the roof of the church turned red, the roof of one of the houses turned black and the trees were replaced with the newer style. Note that the smokestack was still a smooth dowel.

The Town most people are familiar with emerged around 1983. The styling change was minor: the smokestack was replaced with a 12x60mm wooden dowel pin with spiral fluting.

It would remain in production unchanged through 1991. This latter set is frequently seen on eBay, though missing smokestacks are not uncommon.

Just when you thought you’ve seen them all

An auction with eBay Canada turned up something interesting this week:

2002_foldout.jpg

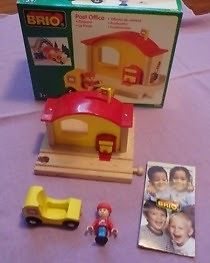
The seller confirms that it’s a foldout catalog. Given that the cover image is a match for the 2002 dealer catalog, and my collection of foldout catalogs has a hole in 2002, I’d say that this is a 2002 foldout. This is the first one I’ve seen and until now I didn’t think BRIO had even made one.

I seriously doubt there is anything earth shattering in this booklet, particularly since I’ve got pretty solid catalog coverage for the early 2000’s, but if you live in Canada, would like this rare booklet, and you’ve always wanted a 2000-era Post Office set, too, then this would be your opportunity.

Building a river

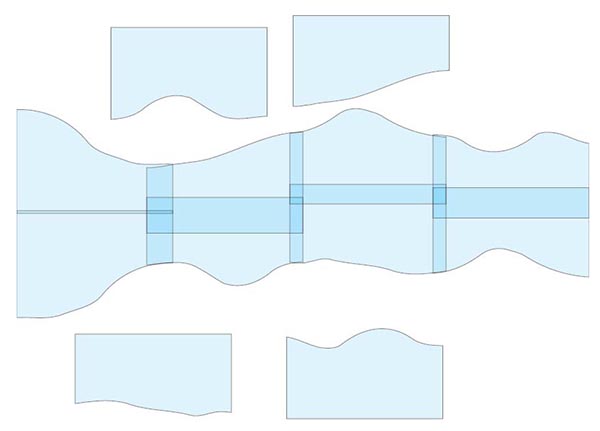
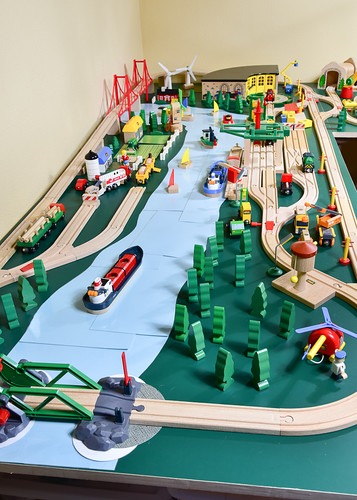
My most recent layout featured a river running through the center of one of the tables, constructed from standard 12″x12″ scrapbook cardstock. Here’s how you can build your own.

Acquire your cardstock squares

In the U.S., the standard scrapbook cardstock size is a 12″ square, but the exact size doesn’t really matter so long as it’s large (at least 8 inches) and roughly square in shape. U.S. cardstock squares are actually a little longer in one direction to accommodate the barcode label and that excess length is trimmed away with a paper cutter.

The more squares you have the more flexibility you’ll have in your river shape so get more than you think you need. Each square is a foot long, but youll need some overlap to ensure a seemless river. A good rule of thumb is to have 25% more length in cardstock than you need on your table.

Make sure your cardstock has the same color or pattern on both sides. You’ll have more flexibility in forming your river if you can flip the pieces over.

Cut your squares in half

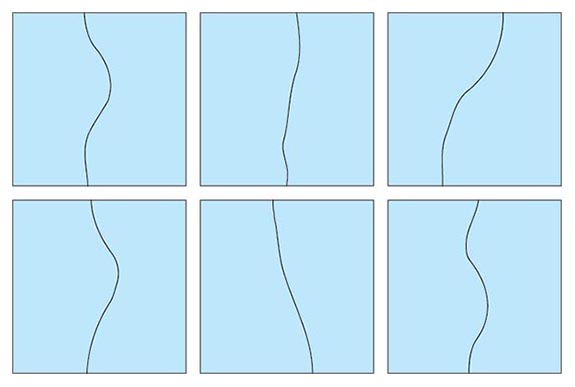
Divide each cardstock square roughly in half using a wavy cut. The center cut will become your shoreline. Experiment both with center-to-center cuts and with offset cuts so that you have pieces that can both widen and narrow your river.

Consider having your tiles hot laminated for durability.

Arrange your river tiles

The straight edges should be in the center of the river and the wavy cuts should be on the outside. Overlap the pieces as needed to sensure a smooth shoreline.

Here’s what the above example looks like in a layout:

Experiment with rotating some of the pieces, as well as having more overlap, in order to give you more options on shaping your river. As you can see in the layout photo below, I made use of angled tiles.

DSC_0086

December’14 Layout

This layout is one that I finished over the holidays, though I’d been tinkering with the design on and off for the past couple of months. I had three primary design goals:

  1. Design the layout specifically for battery engines. This meant using mechanical switches for the primary track switches and graded supports in place of traditional ramp tracks.
  2. Include a full amusement park, assembled from the new #33730 Roller Coaster Set and the vintage #33220 Amusement Park and #33221 Merry-go-round sets.
  3. Have a river running through the center of the layout, or at least a large part of the layout, instead of placing the water along an edge.


The river was formed from standard 12″x12″ scrapbooking cardstock. Each square was cut in half roughly down the middle with a wavy pattern, giving me two shorelines per sheet that were arranged in a winding path. To create the bend, I joined two paths at an angle and used circles to smooth out the joint.

The real challenge was the roller coaster because its large footprint threatened to eat up valuable space that I needed for track. I solved this problem by overlapping the two so that trains passed underneath the coaster.

The town is created from three generations of the Town set: the mid-60’s version with two wide skyscrapers, the 70’s version with one wide skyscraper and the first generation wooden trees, and the 80’s version with the taller and thinner skyscraper that most people are familiar with.

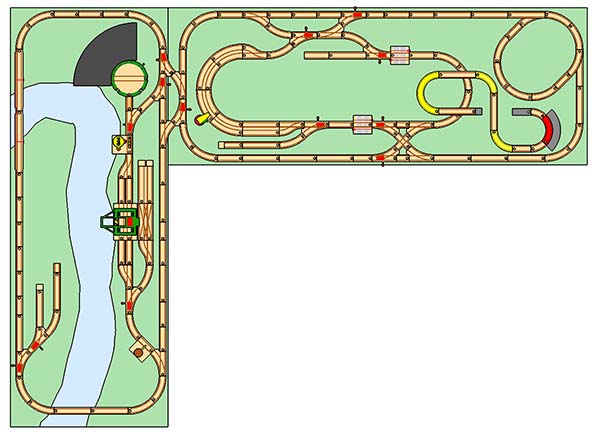
The track plan is shown below (click to enlarge).

Track Plan

Observations on BRIO Catalogs

One thing I have noticed watching eBay for BRIO catalogs over the years is that there seems to have been a major transition in 1992, and again in 2001. If you look at the BRIO dealer/consumer catalogs from the 80’s up to 1991 you’ll notice that they are all “full” catalog books: the complete lineup of BRIO products are shown inside, ranging from infant toys all the way to role play toys aimed at older children.

Beginning in the year 1992 and running through 2000, there don’t appear to be any of these full catalog booklets at all, however. Instead, what you see are specialized catalog books that focus on the individual product lines. For the purposes of this blog, what I am most interested in is the first Wooden Railway system catalog book which appears in 1992 along with its companion photo book. You’ll also note that 1991 is the first year that the modern foldout/brochure mini-catalog insert appears. Coincidence? Probably not. In 2001 the product-specific catalog books start to disappear and the full catalog book returns. There are no Wooden Railway-specific catalog books to be found after 2001 until the overhaul of the BRIO Wooden Railway system in 2010.

This change in the way catalogs were done in the 1990’s would make sense. You can think of the 90’s as being the golden age of the Wooden Railway system as this is when sales were increasing rapidly, peaking in the late 1990’s. Wooden Trains, in both the BRIO and Thomas the Tank Engine lines, were extremely popular toys driven in large part by the Thomas and Friends TV series. Why wouldn’t it have it’s own catalog, particularly versions of it that could be distributed with the large and popular starter sets in order to drive more sales? The full catalog book, in the mean time, was not abandoned entirely: it was merely shrunk down into little inserts that were placed in (neary) every retail package, a practice that continues to this day.

Of course, all of this is just observation and guesswork, and a theory that conveniently fits the information at hand. But just because something isn’t seen on eBay, that doesn’t mean it doesn’t exist. If you know of a full catalog from the years 1992 to 2000, I’d sure like to hear from you.

My Favorite Modern BRIO Not Sold in the U.S.

BRIO released a lot of terriffic products over the past couple of years, but their U.S. distributer Schylling has not brought all of them into the U.S. market. Because BRIO had both a spring and fall line of Wooden Railway accessories and Schylling only updates their product lineup annually, it is possible that some of the 2014 products will come to the States in 2015, but there are no guarantees and there are still a number of products that were released in previous years that just weren’t picked up by Schylling and may never be.

Some of my favorites are listed below with links to searches on the U.S. sites for Amazon and eBay. Always check shipping charges, especially when dealing with eBay sellers, as some services and the Global Shipping Program especially can be very expensive.

![Cargo Engine](/blog/content/brio-dec14/33256_cargoengine.jpg)
###33256 Cargo Engine
Buy it: [Amazon][1] | Released back in 2010, you can get this engine in the U.S. with a grey body and orange trim as part of the #33259 Freight Cargo Train set, but if you want it in the more colorful, and arguably more attractive, blue and red then you have to buy it solo. As you might guess, I prefer this variation.

![Tanker Wagon](/blog/content/brio-dec14/33562_tankerwagon.jpg)
###33562 Tanker Wagon
Buy it: [Amazon][2] |

This tanker wagon from 2011 is probably my favorite of the rolling sock in the modern BRIO product line. The wheel base and the load are solid wood, and in the classic BRIO style the load is removeable. It’s never been available in the U.S. in any form.

![Container & Crane Wagon](/blog/content/brio-dec14/33534_containership.jpg)
###33534 Container & Crane Wagon
Buy it: [Amazon][3] |

BRIO loves variations. Schylling? Not so much. You can get the container ship in red trim as part of the [#33061 Cargo Harbor Set](http://www.amazon.com/gp/product/B004KU836Y/ref=as_li_tl?ie=UTF8&camp=1789&creative=390957&creativeASIN=B004KU836Y&linkCode=as2&tag=brworagu-20&linkId=OTKZ73BN7HEDQ4BW) but the Container & Crane Wagon set gives it to you in blue and includes a nifty crane wagon that you can’t get elsewhere. The Cargo Harbor set is probably the better bargain now that pricing has come down (it was first relesed back in 2011), but if you want blue this is how you get it. This set was released in 2013.

![Steam Engine](/blog/content/brio-dec14/33616_steamengine.jpg)
###33616 Steam Engine
Buy it: [Amazon][4] |

Simple styling and minimal graphics give this steam engine a classic, elegant appearance. BRIO also manufactured a special 2013 Limited Edition variant in mauve that included a coal tender, sold as #33260, but I prefer this version.

![Horse Trailer](/blog/content/brio-dec14/33405_horsetrailer.jpg)
###33405 Horse Trailer
Buy it: [Amazon][5] |

A great addition to BRIO’s farm themes which date back to the early 1980’s and saw a major update and release in 2012. Though there is more plastic than wood here, the detailing and graphics are very nice.

![Airplane](/blog/content/brio-dec14/33306_airplane.jpg)
###33306 Airplane Boarding Set
Buy it:

Another example of variations not being picked up by Schylling, there is not really anything in this set from 2014 that can’t be found in the [#33301 Airport Monorail Set](http://www.amazon.com/Brio-B33301-Monorail-Airport-Set/dp/B00B0IE3RW/ref=sr_1_1?s=toys-and-games&ie=UTF8&qid=1419698391&sr=1-1&keywords=brio+airport) except for the color of the plane. That, and the Airport Monorail set is larger and more expensive even when you factor in international shipping (until recently, it was significantly more expensive). It is arguably the better value, but if like me you don’t want those extras or you just want the plane in blue, then #33306 is the way to go. Unfortuantely, it is also a fairly uncommon set and I’ve not been able to find it on the Amazon market so only an eBay search link is given above.

![Roller Coaster Set](/blog/content/brio-dec14/33730_rollercoaster.jpg)
###33730 Roller Coaster Set
Buy it: [Amazon][6] |

New in the fall of 2014, this set reminds me of the vintage #33220 Amusement Park and is kind of a throwback to when BRIO was adventurous with accessories in the name of world building. The coaster set is a fully functioning roller coaster with a manually operated elevator to raise the cars to the top of the track. The attention to detail is very nice: the special cars have safety bars, the riders have wrist bands and there’s even a sign indicating the minimum safe height for the ride. The set itself might be a little frustrating for younger children because, like all BRIO track, the joints are loose and parts can easily slide around and become misaligned, but with that caveat I think this one is a winner. Combined with the vintage Amusment Park and Merry-Go-Round sets you can make a whole BRIO Theme Park.

[1]: http://www.amazon.com/s/?_encoding=UTF8&camp=1789&creative=390957&field-keywords=brio%2033256&linkCode=ur2&tag=brworagu-20&url=search-alias%3Daps&linkId=XRDAWX3YKJHUU7H7
[2]: http://www.amazon.com/mn/search/?_encoding=UTF8&camp=1789&creative=390957&field-keywords=brio%2033562&linkCode=ur2&tag=brworagu-20&url=search-alias%3Daps&linkId=GPCDT4N3MGZ23XHY
[3]: http://www.amazon.com/gp/product/B00AYP5FGK/ref=as_li_tl?ie=UTF8&camp=1789&creative=390957&creativeASIN=B00AYP5FGK&linkCode=as2&tag=brworagu-20&linkId=O6265PIK7G73UF2W
[4]: http://www.amazon.com/gp/product/B00AYP5G4G/ref=as_li_tl?ie=UTF8&camp=1789&creative=390957&creativeASIN=B00AYP5G4G&linkCode=as2&tag=brworagu-20&linkId=ESYOTOLPDB7X6EXC
[5]: http://www.amazon.com/gp/product/B006IOCR0I/ref=as_li_tl?ie=UTF8&camp=1789&creative=390957&creativeASIN=B006IOCR0I&linkCode=as2&tag=brworagu-20&linkId=AY2TVVGYSRBUZPVL
[6]: http://www.amazon.com/s/?_encoding=UTF8&camp=1789&creative=390957&fst=as%3Aoff&keywords=brio%2033730&linkCode=ur2&qid=1419699551&rh=n%3A165793011%2Ck%3Abrio%2033730&rnid=2941120011&tag=brworagu-20&linkId=7RT4WHJHRLD3DFMB

Climbing hills with battery engines

BRIO’s battery engines, especially those that run on a single battery and have only two drive wheels, are not very good at climbing hills. A single engine on its own can probably manage to climb a ramp track (type N or N1), but attach a load to one of these engines and it will start to struggle. As the video below shows, attaching multiple cars to an engine all but guarantees that it will bind up on the ascent.

Notice that even the 4WD Rechargeable Engine struggles here and in fact does worse than the Freight Battery Engine. What happens is the flexible wheel base for this engine allows for two of the drive wheels to separate from the track on the ascent. Because the engine is much heavier than the standard battery engines the loss of two drive wheels stops it in its tracks. The Freight Battery Engine is actually a nice little performer, but with three loads it needs a boost to clear the hill.

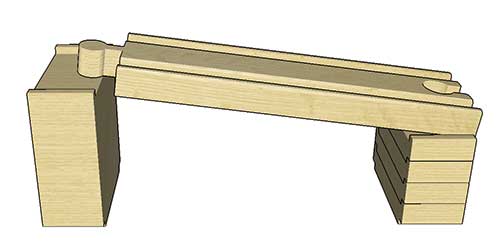
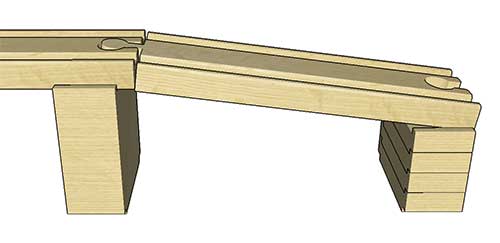
So what do you do if you want to run these smaller battery engines in a layout that makes use of bridges or other multi-level track and accessories? The answer is to use the #33354 Graded Supports. As shown in this video, the gentler slope makes climbing hills a much easier task.

Unfortuantely, BRIO retired the graded supports back in 1998 so you must either find them used or opt for 3rd party equivalents such as the Jesse’s Toolbox Graduated Riser set. I like BRIO’s risers because they are all one-step risers, so you have significant flexibility in how you use them. You can also use the graded supports that were made for the Thomas Wooden Railway system, though be aware that you cannot mix Thomas and BRIO risers in the same stack as they have different widths. The Thomas risers were also retired several years ago, but this does provide you with more options on the used market.

Graded supports do require more space than a single ramp track, however. But, you don’t have to ascend in one-step increments and I’ve found that two-step increments along a piece of A track is a reasonable incline and that’s what I use in the video above. The standard BRIO riser is equal to six graded risers.

Note that I offset the riser at the top of the hill to place it under the peg connector rather than under the joint.

This prevents the peg from sticking up significantly above the track level and accidentally tripping the autostop switch on the engines.

Sometimes, condition doesn’t matter

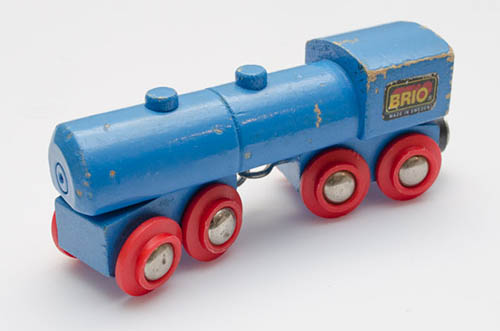
Normally I only buy BRIO that’s in good condition or better, but there’s only so much you can expect from vintage toys and as a general rule the older it is the more compromises you are going to have to make. I think the same can be said about exceptionally rare items, too, even the ones that aren’t really that old. Case in point, I recently acquired this #33429 Blue Steam Engine:

Yeah, it’s in bad shape. The edges are tattered, some of those paint chips are really gouges in the wood, and even the sticker is worn. But here’s the thing: in the 14+ years I’ve been hunting for BRIO (off and on) I’ve seen exactly three of these engines, including this one. And none of them have been in what I’d consider to be good shape.

Sometimes condition just doesn’t matter. Sometimes you are lucky to find the thing at all.