Look what the cat dragged in

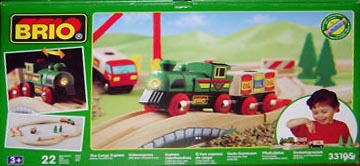
I recently required a new-in-box Cargo Express Set #33105.

Imagine my surprise when I opened it up and found this among its contents:

That, dear readers, is a piece of A3 track.

This is my 6th piece of A3 but the first one that I have encountered new in a box. It’s part of a starter set and not in a #33323 Middle Straight pack, but close enough (my other five pieces were acquired loose from a seller in Germany in early 2014). Set #33105 doesn’t appear in catalogs so I don’t know for sure when it was sold, but given that it includes a green battery engine and it came to me with a pair of 1998 catalogs—a foldout and a photobook—I think it’s a fair guess that it was produced around that time. This is also the year that A3 was introduced.

I am now curious if there are other starter sets that come with this little gem. I know for a fact that A3 was included in the Network Track Pack #33294, but of course that has the BRIO Network paint theme on it making it a not entirely practical source. If I come across any others that do, I’ll be sure to let you know.

EDIT: For the curious, here is the track plan for this set. The A3 piece sits below the Railway Crossing #33388. The gap there is 64mm, and using the A3 piece creates a better fit as well as a slightly wider turn than an A2.

A look at battery packs in BRIO rechargeable engines

Up until 2006, BRIO’s battery engines were all designed to run on a standard, replaceable AA battery. Once the battery died, you tossed it out and put in a new one, or if you were properly energy conscious you used rechargeable batteries and kept a stash of NiCds or NiMHs and a charger on hand. With the introduction of the 4WD Engine #33247 and the 8WD Engine #33249 BRIO offered an alternative approach to battery engines: a rechargeable battery pack and a charger were bundled with the engine, eliminating the need to replace batteries at all. When the engine’s battery died, you simply plugged the charger into the charging port and let it charge over night. Additional battery packs could be purchased and either charged for use as spares, or swapped in to replace the original battery pack when it reached the end of its life.

But what, exactly, is inside the rechargeable engines’ battery packs? Each engine has a custom-designed plastic pack that is completely sealed save for the charging port. To definitively answer the question of what is in there, you’d need to break open the pack. That’s something I may do in the future when I get bored, but for now I can make some reasonable guesses based on the specs that are on the label.

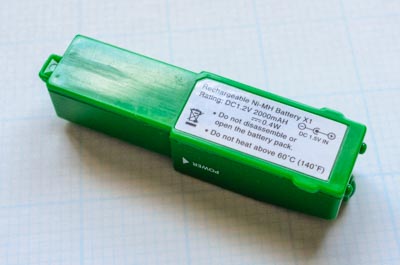
This pack is from the 8WD Engine #33249. The first thing to note is that the battery pack is a NiMH (nickel–metal hydride) battery rated at 1.2 V and 2000 maH. This was a very typical power rating for a high capacity AA NiMH battery in 2006. It stands to reason that this battery pack is really just a AA size NiMH battery with a charging port.

Charging NiMH batteries is actually quite complex due to their chemistry, and the small size of this battery pack suggests that it does not contain a sophisticated NiMH battery charging circuit. Hence, it’s reasonable to assume that the charger just uses the trickle-charge method, which is to send 0.05C to 0.1C into the battery. The trickle-charge method is a simple but very safe method of charging a NiMH cell because it guarantees that the battery will not heat up significantly, and also offers some protection against overcharge since most modern NiMH cells (including those made in 2006) can absorb a charge at this rate when full without incurring significant harm. The down side is that trickle-charging is very slow: at 0.05C a full charge takes 20 hours and at 0.1C it takes 10 hours. The power adapters provided with the BRIO engines are rated at 1.5V and 200 mA, so they provide a trickle-charge at 0.1C and the manuals state that a battery fully charges in about 8 hours (when the engine stops working, the battery is not completely drained, just low enough that the voltage drops off to the point where it can’t provide sufficient power).

This relatively simple charging method is not good for long-term battery life, though, especially if the battery is ever charged without being fully discharged. While it is possible that the power adapter/charger or the battery pack contains a shutoff timer circuit as an additional protection against overcharge, such a timer would only be of benefit to a fully discharged battery. Parents (or children) who got into the bad habit of continually charging their engine when not in use would soon find themselves with a dead battery that would no longer hold a charge. This probably explains the number of negative reviews at sites like Amazon which complain about the battery not lasting very long on a full charge or wearing out after frequent use.

A worn out battery pack could probably be revived by being hooked up to an intelligent charger and run through a refresh or break-in cycle. The challenge here would be connecting the pack to a charger designed for standard AA or AAA batteries. (Edited to add: You want to hook up directly to the battery’s contacts on top of the pack, not go in through the charging port which might have a current limiter and other circuitry in between it and the cell.)

A completely dead battery pack could likely be “repaired” by just opening it up and replacing the battery with an off-the-shelf AA NiMH, though that might require some jury-rigging of the insides since sealed battery packs often times have leads soldered directly to the battery terminals. The upside to doing this, though, is that you could take advantage of newer, higher-capacity NiMH batteries that also hold their charge when not in use, and do so in a manner that lets you pull out the battery for recharging in an intelligent charger with independent charge circuits (so that you aren’t forced to charge batteries in pairs).

Edit: 4/15/16

Reader Andrew J. opened up his pack and posted a photo online. Thank you for sharing, Andrew! As I suspected, the battery pack is just a 2000mAh NiMH battery with some circuitry (perhaps a simple voltage regulator).

Why I don’t generally mix brands of track

You’ve probably noticed that I almost exclusively use genuine BRIO track. There are some exceptions to this of course: I point out that you should consider getting the Maxim 3″ Mini Straight or the Jesse’s Toy Box 3″ Straight as a substitute for the discontinued and short-lived BRIO A3 track, and there are other pieces in the BRIO system that are simply very difficult to find but very handy such as as the F2 and G2 parallel switch tracks. But by and large, I stick with the BRIO brand.

Why is that? I’ll admit that part of it is that I am a BRIO purist. Virtually my entire collection is BRIO with only a handful of track pieces coming from other manufacturers. That’s a snobbish reason, sure, but it’s not the reason why I stick with BRIO track. So what is? Well, the mainly it is because I started with BRIO track, and the issue with mixing and matching track is that you create problems with symmetry.

Each track manufacturer uses a slightly different standard for their track lengths. BRIO’s track lengths are measured in metric and their primary lengths are the 216mm and 144mm straight. The track for Thomas and Friends is based on Imperial measurements and their straight lengths are measured in inches. Maxim’s track measurements are stated in inches but the measurements are actually in metric and the imperial distance is a rounded measurement, e.g. their 3″ straight track actually measures 82mm which is just shy of 3-1/4″. When you arbitrarily mix track from different sources, you introduce uneven lengths or curve radii into your layout, making it more difficult to create a symmetrical design.

Symmetry is your friend because it guarantees a perfect fit when your track is laid out. You can create more complex layouts from two or more simple, symmetrical designs simply by overlapping them or joining them at one end. Symmetry is really the basis for success in the wooden railway system which is plagued with 45-degree angles and other confounding geometry. Anything that breaks track symmetry serves only to introduce additional frustration into your planning.

That doesn’t mean you need to go out and buy only BRIO-branded track like I do, but it does mean that you should mostly stick to a brand that you like, be mindful of what happens when you introduce track from different sources into your toy chest, and most importantly store that track separately so that you know which track is which when building your layouts.

More paper experiments

I picked up some more cardstock in a variety of colors and patterns, some of which are shown below.

paper.jpg

I’m fiddling with different ideas for representing land and ground cover in layouts. The light green stripe and grid patterns are possibilities for farm land, and the dark green with its irregular pattern might work there as well. I have some lighter, solid greens that I am considering in small patches to make parks, or to use for the ground around lakes and ponds. The solid browns and tans could be used to represent dirt, perhaps as shorelines or in industrial areas.

The black and white textured paper is sort of a wildcard in that I don’t quite know what I want to do with it, but envision it as a way of representing gravel as-is, or sanded lightly (the paper is designed for that) to become a faded blacktop.

Progress on the layout guide

I know. It’s been a while since I’ve made updates to the layout guide.

Much of the progress on the guide was halted when the catalog section expanded, and that was followed quickly by the product database which was an enormous undertaking. I’ve actually been working on the layout guide over the past three weeks but it’s been slow going. The next segment will cover freight yards and I’ve spent a lot of time putting together various track configurations for it, some of which I liked and kept, and some of which I didn’t and had to redo (sometimes more than once). It is coming, but it may be another week or so.

After that will be a shorter, much easier section on coach yards which will finish off the section on yards. Then I’ll probably talk about expansion options for arranging multiple tables into L and T configurations.

Why use mechanical switches?

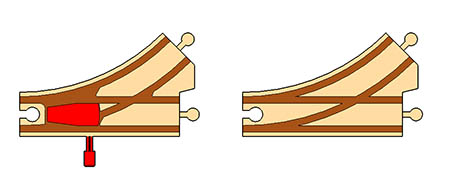
The standard BRIO switch is the curved switch track and it comes in two basic configurations: the traditional wooden track types L and M sold in pairs as #33346, and the mechanical switch track types L1 and M1 sold in pairs as #33344. The mechanical switches cost twice as much as the traditional track if bought new, but of course BRIO track can often be had for pennies on the dollar if bought used on eBay making the mechanical switches even more expensive by comparison. There are simply far fewer used mechanical switches for sale, either in lots or by themselves, where as the basic switching track is pretty much everywhere. So why buy mechanical switches when they cost so much more?

Well, the key advantage of a mechanical switch is that it prevents derailments. Unlike a traditional switch track, the mechanical piece guarantees that all the wheels in the carriage will follow the same path, and that all wagons in the train will do the same. With the classic track, some manual guidance is needed to ensure the train goes the correct direction, especially when negotiating the curved portion of the switch.

Switch style comparison

This is clearly important for battery trains, the whole point of which are to run without needing to be handled. But mechanical switches are useful even for unpowered engines, too. If you want to set up a layout where the default path through the switch is the curved path, not the straight, then a mechanical switch is going to be a lot more convenient and a lot less hassle than a traditional switch.

There are some down sides to mechanical switches, though. First, they are, as mentioned earlier, more expensive and harder to find used. Second, they take up more space. The mechanical actuator sticks out almost 30mm from the side of the track, so you can’t lay the straight edge of a mechanical switch very close to a parallel run of track. And third, you have to be able to reach the actuator to move it.

With some careful planning, though, you can work around all of these. In general, it comes down to the following: use mechanical switches only where they are truly needed, and plan your layout so that there is room for them. In the coming days, I’ll be updating the 2-D SketchUp model file to include the mechanical switch parts to help with that.

September ’14 Layout

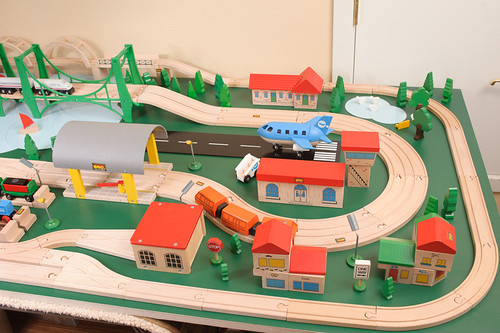
I just finished making a layout that incorporates a large number of my newer BRIO pieces, dating from about 2007 and on, as well as a fairly large double track layout. The central theme was to create an airport around the #33306 Airplane Boarding Set and a mass transit loop with multiple stops to connect to it. Sadly, this particular set is not currently available in the U.S., but you can either buy it from an international seller or get it’s larger brother, the Monorail Airport Set, from Amazon to get a plane in white and red instead of blue and white.

D7C_3914

The runway was something I built myself. It’s a 4″ x 24″ x 3/16″ sheet of basswood which I sprayed with several coats of Rust-Oleum black lacquer paint to build up a nice surface. Once it had cured for several days, I created a plastic stencil for the runway markings and applied them with Rust-Oleum’s white lacquer spray in about five or six light passes. I let that cure for several days, as well. To make the rest of the airport I simply reappropriated existing BRIO accessories. The late-90’s vintage #33564 Signal House looks so much like a control tower that some people on eBay mistake it for an airport, so that was an obvious choice. For the terminal building, I chose the 90’s vintage #33663 Railway Station only without the decorative window on top.

The water that forms the main lake, ponds, and the sea port is light blue cardstock that has been hot laminated for durability (this also had the side effect of making the water slightly reflective, which is a nice effect). This is something I discussed in an earlier blog post and you can see the final look in the rest of the layout photos.


View the album directy on flickr if you don’t have Flash or if you’re on a mobile device.

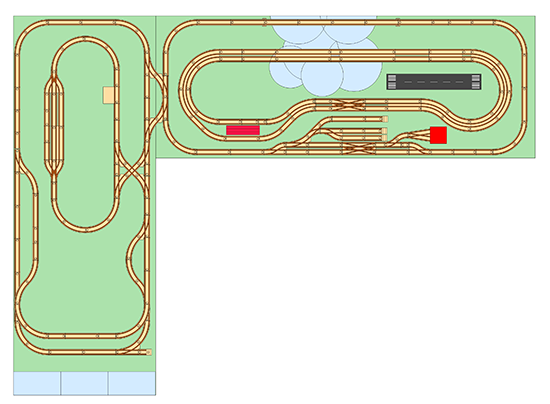
Here’s the track plan (click to enlarge):

This was arranged on my two 8′ x 3′ laminated plywood sheets which I use as table tops. This layout does make use of two pieces of A3 track at the crossover, though that is easily changed if you don’t have A3 or an equivalent straight.

Breaking up is easy to do

Yesterday I pointed out a #33594 Truck that is currently for sale on eBay, but now it appears that it was actually part of a #33520 Trucks and Cars set, which is in itself also quite rare. The seller has listed the red, single-axel trailer from that set as a separate auction.

Usually when stuff like this happens—a seller splitting up a set or part of a set—it’s because they aren’t familiar with the product line and don’t really know what they have or what goes with what. There are a lot of people selling BRIO on eBay, and a good chunk of them are probably parents getting rid of their child’s old train set that has lost pieces over the years and was all mixed together and shoved into boxes. You can’t blame people for not knowing which pieces are part of a particular set, or for breaking a large lot into more manageable pieces.

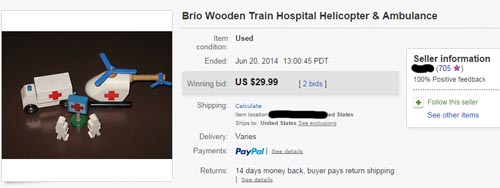
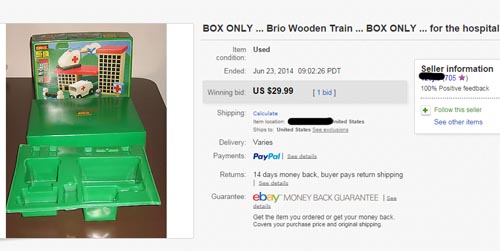
Usually. There are rare occasions—very rare—when it’s just plain asshattery. Such as with this guy who sold the buildings from the Hospital set in one auction:

hospital-1.jpg

The vehicles in another:

hospital-2.jpg

And then the empty box three days later:

hospital-3.jpg

But most folks don’t do this sort of thing and I tend to give sellers the benefit of the doubt. As frustrating as it may be to the collector, the truth is that most people just don’t know what they have, or that they are breaking up a set. As a buyer, only you can decide if it’s worth taking the risk to bid on two or more partials.

I thought you said those were rare?

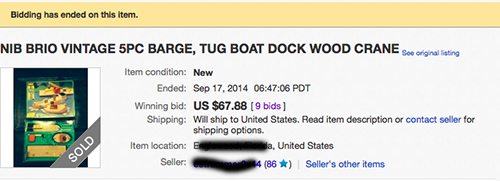
No sooner do I do something presumptuous like write an article about rare BRIO items from the 80’s and 90’s, than three of those items show up for sale on eBay. That very same week, both a #33215 Small Harbour and a #33594 Truck appeared, the former even new in box, still shrink-wrapped! And a #33382 Windmill came up a week later. I still stand by my original claim that these items are among the rarest of their vintage, but I admit that the timing does make me look a little silly.

All kidding aside, I don’t remember the last time I saw a Small Harbour, much less one with its box. It sold for a respectable price, too:

Screen Shot 2014-09-17 at 6.49.10 PM.png

About $68 on 9 bids, though that did include free shipping.

The Truck, on the other hand, is on it’s second time around with an opening bid of $29.95 and $3 shipping. This is a good example of “rare” and “valuable” being two different things, and “valuable” also being a relative term. It’s hard to imagine this item selling for that much, especially since it is in rough condition, though I have been surprised before.

The Windmill includes its box but is missing its stairs. And like every other used Windmill it has stress lines in the sails, though these look better than most.

Restoring the gas tanker truck from #33533

I acquired a #33533 Gas Station set whose yellow tanker had definitely seen better days. When I got it, the paint was chipped along the edges, worn in several places, and had completely lost its sheen. My goal was to restore it to it’s former glory, using the Testors Model Masters Spray Lacquer in Chrysler Yellow.

The first step was to lightly sand the finish to prepare it for the fresh paint layer. I didn’t want to take the paint all the way off since there was plenty of paint there that could serve as a base for the fresh coat, but rather the remove any dirt and smooth out any rough spots so that I’d have a nice, smooth finish when I was done.

The sanded tanker is shown below. Note that even with my light sanding, there are still some significant rough spots in the tanker’s finish. This piece had definitely seen some rough play.
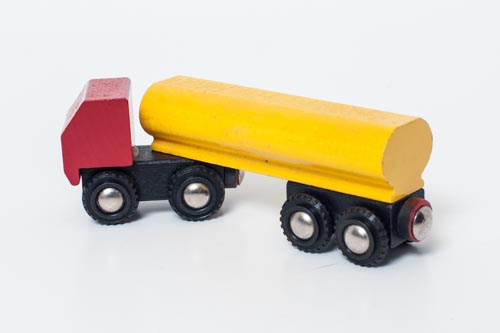
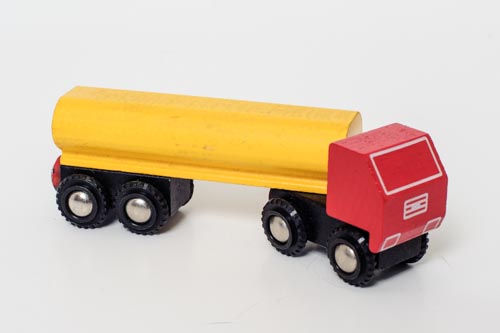
Next up was masking off the wheels. This was delicate work, since I had to get tape between the wheel and the undercarriage along the top edge where it meets the tanker body. I had to tear the tape into thin strips to have something narrow enough to fit between the axel and the tanker body to form a nice line here. Then I used more tape to completely enclose the wheel assembly. I recommend using ScotchBlue painters tape for delicate surfaces since it has a milder adhesive than regular masking tape, which will prevents damage to existing finishes. It comes in three widths and I find all are handy to have.
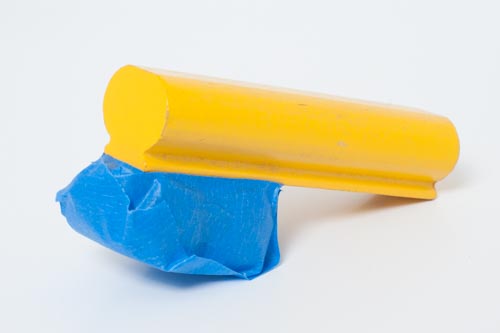
For spraying, I placed the part on a grill so that it was not resting directly on the ground. This not only prevented paint drips from pooling around the edges, but also provided extra airflow for drying. My grill was just a scrap piece of wire shelving, left over from a shelving installation in the garage.
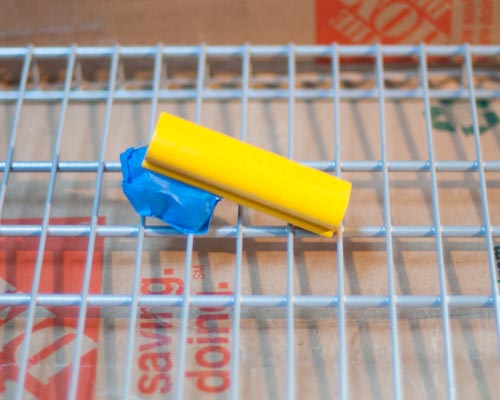
The Model Masters spray lacquer is a fairly thick paint, but it applies in nice, even coats. The tanker, like most BRIO parts, is a fairly small target relatively speaking so I held the can fairly close—about 6 to 8 inches away—and applied the paint with smooth but brisk strokes. I used three passes, allowed the paint to dry for a few minutes, and then repeated. After the second set of coats had dried to the touch, I turned the part around and repeated the procedure on the other side. Then I let the part dry over night before spraying the underside, since this meant turning the tanker on its back. The paint does not really start to cure for a few hours, so doing this too soon would have marred the new finish.

The Model Masters custom lacquer system is a two-part paint system, consisting of both a base coat and a clear coat. The clear coat must be applied within 24 hours in order to properly bond with the paint layer. I found that the paint layer has sufficient gloss to it that it was not necessary to add a clear coat, so I left it as-is.

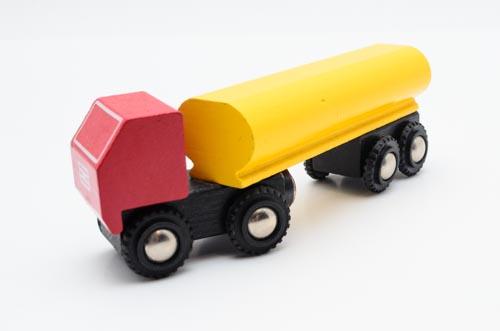
Here’s the finished truck:
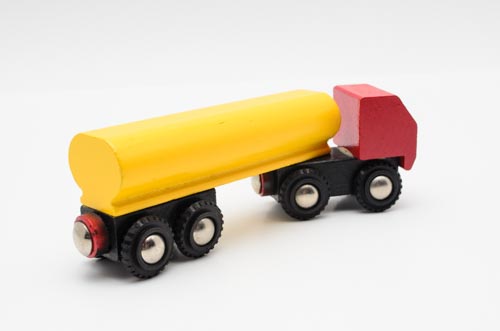
The paint finish has a nice sheen and looks clean and smooth. The paint did not perfectly flow into the grooves (which I did not clean very well), but by and large the tanker looks significantly better than it did before. The formerly chipped edges are a slightly thinner yellow than the rest of the body since I did not do a “proper” paint fill—filling paint chips correctly is a laborious and time consuming process involving slowly filling the chip to build up the paint layer, sanding, and then refinishing—but they are good enough.

The next step is patience. Paints dry in hours, but take days to fully cure. During the curing process, the solvents in the paint evaporate and the paint layer hardens, forming the wear-resistant finish. Exactly how long it can take for paint to hard-cure varies with temperature, humidity, and the number of layers of paint that have been applied, but as a general rule you should allow 30 days for the process. This is especially important if you intend for children to play with the refinished toy: paints are not safe for toddlers until the solvents have evaporated.