Testor’s spray lacquers are safe for use on toys

Earlier last week I wrote about one lacquer paint option for restoring the BRIO yellow finish, using the Testors Model Masters paint line. I contacted Testors, who is owned by Rust-Oleum, and asked about the child safety of their paint line. Their response is below.

The short of it is, the paints are safe once they have cured. You should wait for 30 days before selling a toy that has been repainted or allowing a toddler to play with it.

Subject: Re: Paint [#91058]
Date: Wed, 10 Sep 2014 15:02:07 +0000 (GMT)
From: ROProductSupport <roproductsupport@rustoleum.com>
Reply-To: roproductsupport@rustoleum.com

John,

Thank you for contacting Rust-Oleum Product Support.

Rust-Oleum® paints are unleaded and safe for use on toys and furniture. The cautions on the cans refer to the liquid form of the paint and are driven by the solvents in the paint. Once the paint is fully cured, the solvents have evaporated and are no longer in the coating; the remaining coating is a combination of solids made of pigments and additives bound by the resin and can be considered non-hazardous.

Thanks,
Reggie

Representing water in layouts

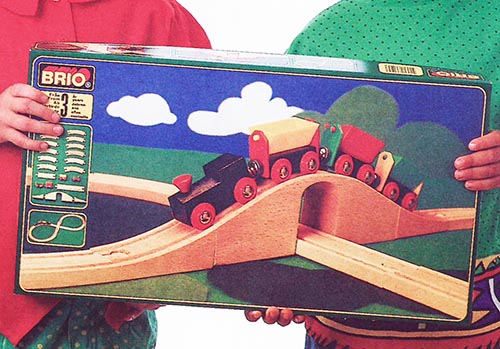
One of the many things I loved about the early 90’s BRIO catalogs and retail boxes is the layouts used in the product photos. There was a very minimalistic approach to creating a landscape for the railway system, consisting of felt cutouts and painted backdrops to represent the sky, ground, and water, such as on this product photo taken from the 1991 catalog:

Box image for the BRIO 33125 Viaduct starter set from 1991

I’ve been building my layouts on a laminated table surface for many years, using a Wilsonart laminate in hunter green to represent the ground, but only recently have I turned my attention to trying to represent water in my scenery. As much as I love the look of the laminate, having boats sailing on a sea of green needed to change. But what to do?

BRIO’s approach of using felt really resonated with me, but it was also the opposite of what I needed. They started with blue water as their base and built up the land around it, where I was starting with land and needed to overlay a water look on top of it. Felt is simply too thick. David Harper’s approach was to use plastic table covers in green and blue, but his layouts span multiple tables and he’s covering a much wider area. I needed something just as thin, only smaller in size.

What I settled on was colored cardstock. Specifically, the 12″ square cardstock used for scrapbooking, and available at arts and craft stores and sold as loose sheets. I chose a light blue color, specifically one called “powder blue” at Joann Fabrics, so that it would contrast against the darker green of my table top. Cardstock is thick enough to be durable but thin enough that overlapping sheets still lay reasonably flat.

Taking inspiration from BRIO, I cut several of my cardstock pieces into circles using a large circle cutter—I recommend the Martha Stewart Crafts Circle Cutter for this task as it doesn’t create a hole in the center of the disc—creating several circles that were 11.5″, 9.5″, and 6″ in diameter to give me multiple sizes to work with. I also created two more of the large 11.5″ diameter circles and split them in half with a paper cutter so that I could start the water along the edge of my table. (I also left some sheets as squares, and cut some into 3″x12″, 6″x12″, and 9″x12″ rectangles for modeling water along table ends.) Finally, for extra durability, I had them hot laminated.

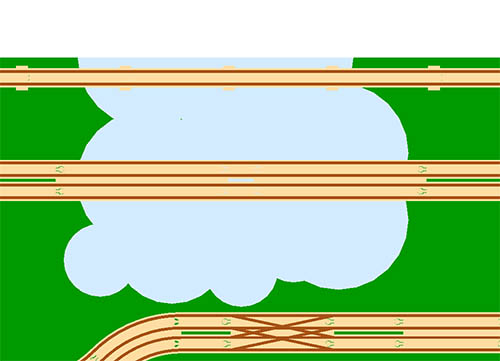
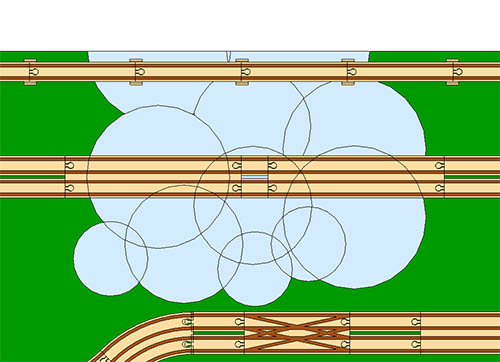
To create the water effect, start with the half-circles at the edge and then overlap the larger circles to expand the lake or river, filling in with the smaller ones to eliminate gaps and finish off the edges. Adjust circles as needed, adding the smallest ones along the edges until you are satisfied with the look. Here’s a layout plan using SketchUp with the edges turned on to show the circle placement:

The layout mockup in SketchUp, with edges

And without the edges to better represent the final look:

The layout mockup in SketchUp, with edges

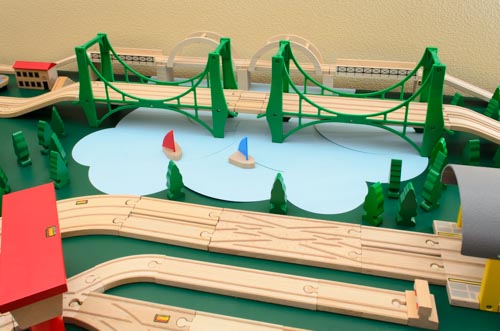
And this is what final effect looks like in a (not-yet-complete) layout:

The actual layout

The beauty of the scrapbook cardstock approach is that it’s cheap and the paper is available in a wide variety of colors, some even with abstract textures. You can even use craft techniques such as sponges and paints to add your own texture effects to the paper. You aren’t limited to water, either, and can use other colors and textures to represent different types of land.

Perhaps best of all it’s also a wood product, which is in the spirit of your wooden railway system.

Matching the BRIO yellow paint

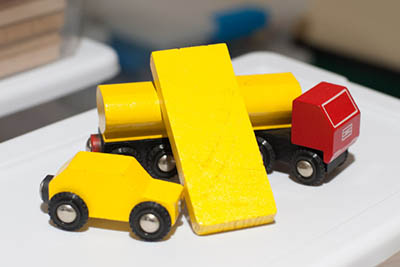
The below is a photo of a wooden block painted with the Testors Model Masters spray lacquer #28104 Chrysler Yellow PY3. As you can see, it is an extraordinarily close match for the various shades of yellow BRIO has used over the years. The angle of the wooden block with respect to the camera makes it look a little brighter and lighter than it really is so it is even closer in appearance in person.

Model Masters PY3 Chrysler Yellow

The Model Masters paint is technically a two-step process, meaning you should finish it with a clear coat after you are done. At one point Testors made numerous finishes in the Model Masters line, but now appears only to produce a high gloss top coat. Any spray lacquer clear coat should work.

In the next couple of days I’ll be restoring the finish on an old gas tanker truck that has seen better days using this paint and will share the process here.

WARNING! This is a solvent-based lacquer paint that may not be appropriate for toddler toys. At the very least, the finish should cure for 30 days until it hardens completely before being handled by young children.

EDIT: According to Rust-Oleum, this paint is safe for childrens toys once it has cured.

The BRIO 33730 Roller Coaster Set

The BRIO #33730 Roller Coaster set was recently released in Europe.

33730-roller-coaster-set.jpg
Photo taken from the 2014 BRIO retail catalog

In case that picture isn’t enough, BRIO also has a short video showing it in action. This one is a real beauty, and for those fortunate enough to have the vintage Amusement Park and Merry-go-round sets it should be a wonderful supplement. You can build your very own BRIO theme park!

Only time will tell if this gem will be released in the U.S. Unfortunately, not all of the 2014 BRIO products have made it to this side of the Atlantic. If you can find a retailer that will ship internationally, this one looks worth paying for overseas delivery.

The single-axle assembly

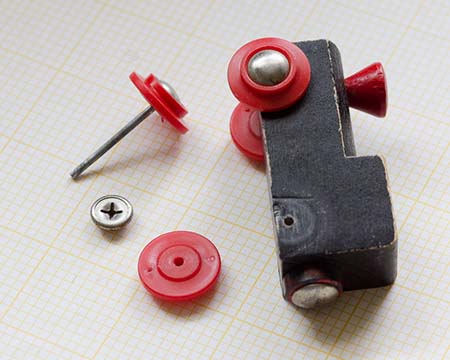
Curious what the axle and wheel assembly looks like on the modern, rimmed wheel design? Here it is.

axel-assembly.jpg

The axle is a 32mm long shaft that is 2mm in diameter. The end caps snap in to the hubs of the plastic wheels, and then push on to the shaft. The four metal tabs on the reverse side grip the shaft ends, which are scored in four spots to improve the hold.

Removing the wheels without bending the shaft, damaging the wheels, or damaging the body is a challenge. You can use gentle prying to remove one cap, but this will bend the shaft at the wheel where you insert your crowbar. Ideally, you’d pull each wheel on the axle away from the body with equal pressure, so as to not put any pressure on the body and to ensure your force was aligned along the axle, until one popped off. But, realistically speaking, the tabs on the endcaps imply that the single-axle design is intended to be an install-only procedure. Disassembly for the purposes of restoration is an “at your own risk” activity.

BRIO catalogs from 2010 through today

I do not know if BRIO prints physical catalog books anymore—they still print the fold outs that are inserted into retail packages—but you can view digital versions of their full catalogs from 2010 and on at Issuu. They have Wooden Railway catalogs for 2010 through 2013, and general retail/toy catalogs (which include the Wooden Railway system) for 2012 through 2014. I have created a stack of these catalogs which you might find easier to peruse than the full BRIO feed:

View BRIO catalogs from 2010 through today.

Mystery track: a 73mm F-F straight

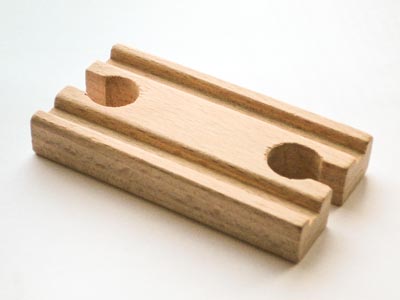
This mystery comes to me from BRIO and Thomas collector artheathen. This track piece is made from beechwood and measures 73mm long. The mystery is, where did it come from?

Mystery C3 piece

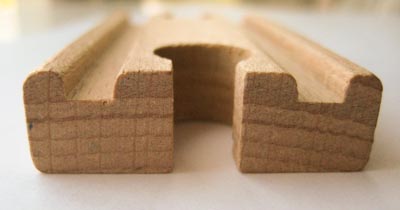
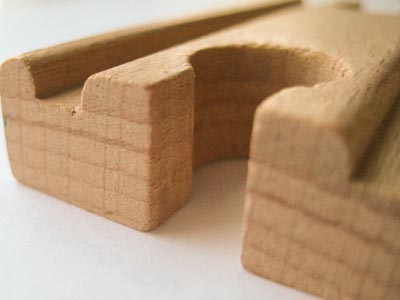
In the BRIO system this track would bear the ID “C3” since it is a 73mm straight with female connectors at both ends. Almost, anyway, since the A3 track is 72mm and not 73mm. BRIO has not, to my knowledge, ever produced such a piece and track A3 did not appear until 1998. By then BRIO was not only stamping it’s track, but had also long been chamfering the grooves in the rails, as well as the throat of the female connector. There’s no stamp, and close-ups of the end show very rounded rails, and a straight cut at the throat.

Cross section

Throat corner cut

Even in the early days of BRIO track production there was not, to my knoweldge, this large rounding of the grooves. The rails were either cut straight, or had a very slight rounding or chamfer. The rounding in this mystery piece more closely resembles that used by Jesse’s and Orbrium’s track manufacturer, except that the quality of this track is much, much higher.

In fact, this track piece is so well made that I really don’t know what to make of it. I’m 90% sure it’s not a BRIO piece, but BRIO did manufacture custom pieces in some of it’s vintage sets—the Harbour #31405-40 comes to mind—so I’m not comfortable going that extra 10% and proclaiming it with absolute certainty. But I am skeptical.

Have any ideas? Let me know.

Historical BRIO product numbers

If you look at a BRIO catalog from 1980 you will see that each product has two product numbers, one of the form NNNN and one of the form NNNNN-NN. For example, the original Tunnel is listed like so:

3362 31405-12
Tunnel.

Neither of these numbers appears to be related to the another, though the four-digit number 3362 is nearly identical to the modern, five-digit product code for the Tunnel which was 33362. Jump to 1983, and the product codes show yet another variation. While the four-digit product code hasn’t changed, the five-dash-two product code adds a prefix, giving a final form of N-NNNNN-NN. Returning to the Tunnel, the product code was given as:

3362 4-31405-12

Why are there some many product codes, and what do they mean?

To answer this, we have to go back to the original BRIO wooden railway product which was first sold in 1957. Back then, it was called the BRIO Miniature Railway, and it was given the product code 31405. The Miniature Railway was just one of several BRIO products, and it did not have the extensive list of accessories that are present today. It was just a single product, sold under the code 31405.

As the popularity of the wooden railway grew, BRIO began to add accessories. Rather than give each of these items its own product code, they were given a sort of subcode: a two-digit suffix appended to the wooden railway code. The Tunnel, #31405-12, was accessory 12 in the 31405 product line, and thus, the NNNNN-NN code system was born. The catalog sheet from the mid-1960’s shows the accessories that were available for the wooden railway system at the time—it was still called the Miniature Railway at that point—all under the 31405 master code. (Note that back then, the codes were actually given the form NNNNN/NN instead of NNNNN-NN.)

In 1980, and possibly earlier, BRIO began the transition to a unique 4-digit product code for all products. This is more speculative, but it appears that BRIO had a transition period of several years where they used both the new and old product codes in catalogs. Whether this was to give BRIO, retailers, distributors, or all three sufficient time to transition their computer systems and records to the new numbering is unknown. What is really strange, however, is the 1983 catalog sheet that introduced the prefix code while the 4-digit code transition was still in progress.

In 1983, there were two prefix codes: 4- and 7-. The 4- prefix wes used for traditional accessories and wes paired with the 31405 base code, but the 7- prefix wes used for starter sets and was paired with the 31404 base code, and given a unique suffix code. Even the “original” Miniature Railway boxed set, 31405, was renumbered to 7-31404-50. Some of the 7-31404 codes (with descriptions, as the starter sets were not given unique names back then) were:

  • 3115 7-31404-20 Circle set
  • 3125 7-31404-25 Figure-8/viaductset
  • 3145 7-31404-50 Original miniature railway set

In 1984, BRIO completely dropped both the old product numbering scheme and the prefixes, and adopted the 5-digit product code that we see today. The 5-digit code was created simply by taking the 4-digit code and prefixing it with a “3”. So the Tunnel, 3362, became 33362, the Circle set 3115 became 33115, and so on.

While these new 5-digit codes are guaranteed to be unique in a given catalog year, a few of them were recycled over time so product numbers are not unique throughout all time. Code #33379, for example, was used for both the Quay-Berth accessory from the mid-1980’s and the Small Town set from the mid-1990’s.

There are still a lot of unanswered questions, namely why BRIO made so many changes in the early 1980’s, but this should explain how these product codes evolved over time, and where they originated.
Buying on eBay isn’t always a bargain

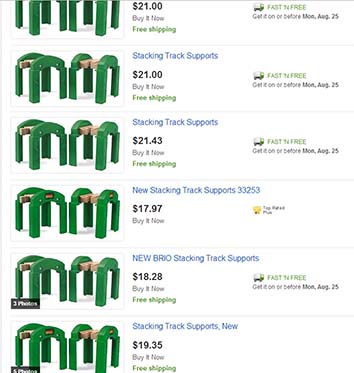
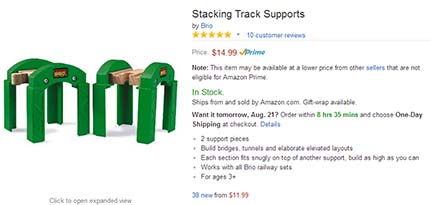
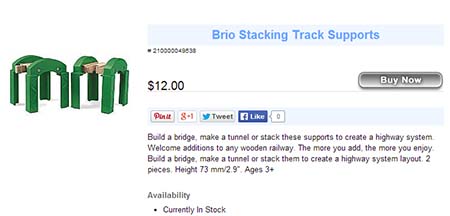
In my article on Buying BRIO on eBay I point out that eBay is not typically a bargain when it comes to items that are still sold in retail stores. A good example of this is the #33253 Stacking Track Supports, which I very frequently see for sale on eBay in the U.S. at inflated prices.

stacking-supports-ebay.jpg

As of August, 2014, this is sold for less via Amazon, with free economy shipping:

stacking-supports-amazon.jpg

Sometimes you can do even better at traditional brick-and-mortar establishments. In this case, Finnegan’s Toys in Portland, OR:

stacking-supports-finnegans.jpg

Just because it’s sold on eBay, that doesn’t make it a deal.

Why curved switching track has oddly-shaped notches

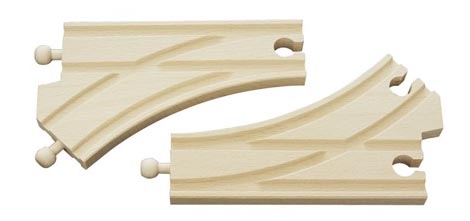
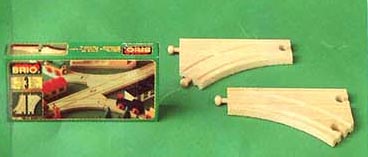
You’ve probably noticed that BRIO’s curved switching track L and M, and the mechanical versions L1 and M1, have an oddly-shaped notch at the curved end:


Product photo by BRIO AB

Why this funny shape?

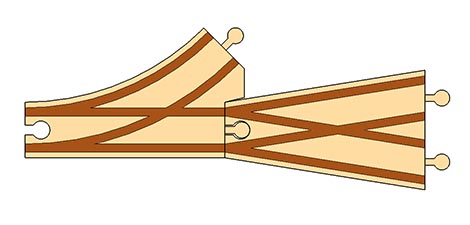
It’s designed to accommodate the straight switching tracks, F and G, like so:

The straight switches F and G were actually the first switches in the BRIO track system, dating back to the very first sets in the 1950’s, and were in fact the only switches for over 20 years. The curved switches and double curved switches, L, M, I and J, did not come along until the early 1980’s.

The first versions of these curved switches were actually slightly different from the ones we see today. The straight track path was actually longer than on the modern switch track, so that the edge on the curved side formed a straight edge as shown in this picture from the 1983 product sheet:

The problem with this original switch design is that the straight track path measures 158mm, which does not correspond to any straight track length in the BRIO system. If you insert one of these older-style switches into a symmetric layout such as a loop, then you have to place a second one on the opposite side to keep the symmetry and ensure the track will still meet.

When the straight path in the switch was shortened to 144mm in order to match the A track length, the edge on the curved side had to be notched in a way that would allow existing BRIO track to connect with it. Specifically, F and G with their angled ends had to fit, hence the funny shape to the notch.