Here’s some advice and resources on techniques and materials for those who are interested in attempting minor or major restoration on a BRIO toy. Note that not all problems have solutions so in some cases the advice is “you’re out of luck”.
Paints
Plastic
- Removing stress lines from plastic
- Fabricating plastic parts (why it’s not realistic)
Wood
Commercial lacquer paints that match BRIO colors
Finding a lacquer paint that closely matches the color of the original is not an easy task, but there are some commercially available paints that are excellent substitutes for many of the vintage BRIO colors. While these are not all perfect, there have been enough variations in BRIO’s color tones over the years that they are very good fits.
| Color | Reference Image | Recommended Commercial Paint |
|---|---|---|
| Black White |
 |
Rust-Oleum Lacquer Spray, in Black or White
(Note that this can generally be purchased at home improvement stores for a lot less money than from online retailers) |
| Blue | 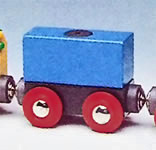 |
Tamiya TS-10 French Blue Spray Lacquer |
| Green | 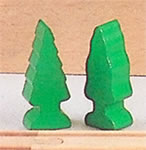 |
Tamiya TS-35 Park Green Spray Lacquer |
| Yellow | 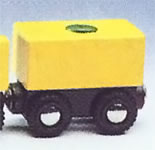 |
Tamiya TS-35 Park Green Spray Lacquer |
I have yet to find an acceptable match for the BRIO red. This color has shown the least variation in their products over the years so finding an appropriate replacement has been a real challenge. Red is used on most of BRIO’s roofs so any mismatches really stand out.
Note that all of these lacquers are synthetic lacquers. The Testors and Tamiya paints in particular are designed for use on plastic models (true lacquers require more powerful solvents that are chemically hot enough to melt plastic). Don’t apply a “true” lacquer clear coat over a synthetic lacquer, or you run the risk of cracking the pigment layer.
Applying lacquer spray paint
Each brand of lacquer spray has different properties and thus applies somewhat differently, so you’ll want to experiment with a scrap piece to get a feel for how your particular paint behaves. In general, though, you want to apply several very thin coats, with plenty of time between coats for the paint to dry and the solvents to evaporate. You won’t reach full color saturation from the first few coats, so be patient!
I find that the Tamiya paints tend to be on the thin side while the Testors paints are much thicker. The Rust-Oleum paint is somewhere in between.
Tamiya USA offers excellent advice on how to apply their lacquer paints, and much of what is written there applies to lacquer sprays in general.
Both the Rust-Oleum and Taimiya paints are a one-step system, meaning you do not need to finish with a clear coat.
Testors Model Master spray paints are a two-step system. Once the final color coats has dried, you must apply a clear coat within about 24 hours so that it can bond with the pigment layer. If you don’t apply the clear coat you won’t have the proper surface hardness or gloss. If you forget to apply the clearcoat in time, simply lightly sand the color coat, spray a thin layer of the color on, and then apply the clear coat.
Make sure you allow ample time for each coat to dry before applying the next. This is particularly important for the Tamiya and Rust-Oleum paints which go on fairly thin. The first coats, especially, need to dry until they are no longer tacky because they will serve as your primer coat. Spray the next coat too soon and you are just adding more solvent to the existing layer of uncured paint and you’ll get a thin, runny layer instead of a nice buildup of color. I find it best to apply the first two coats as two passes, one in each direction, and then let the paint dry for a good 30 minutes to an hour depending on humidity and temperature.
Note that BRIO parts are small relative to the spray pattern from these paints. You might be tempted to hold the spray can closer than the recommended 10-12 inches. Don’t. This will lead to a very thick application of runny, thin paint and you’ll almost certainly end up with a very wet coat that takes hours to dry, and runs and drips that will need to be sanded down. Hold the can at the recommended distance and work in even strokes. You’re going to end up painting your dropcloth or backsplash as much as, if not more than, your BRIO part. Just accept that you’ll be wasting paint in this process.
All of these paints should be allowed to hard cure for 30 days so that the solvents can completely evaporate. This is particularly impoertant if the toy is going to be handled by small children.
Removing stress lines from plastic
You can use a heat gun, such as the kind used for embossing in craft projects, to remove the stress lines that form in plastic that has been severely bent. Hold your heat gun a few inches from the plastic and turn it on. Heat the plastic surface gently, watching the surface carefully. You want the plastic to get warm enough that the surface becomes shiny and the plastic softens but does not melt. The stress lines should start disappearing before your eyes.
Be very careful not to melt the plastic. You may need to back off and let the part cool down for a while and then return to it if the damaged area is very large or the stress lines are particularly deep. Also be careful not to deform your piece. Getting it warm enough to remove these lines also makes it soft enough to bend and warp. Handle your part with care until it cools down.
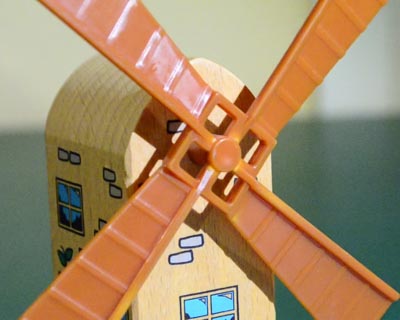
Here’s a three-minute video that shows the technique in action on a #33382 Windmill, an accessory that is infamous for its bent sails. The stress lines start vanishing at 1:45.
Here’s the before image from the video:
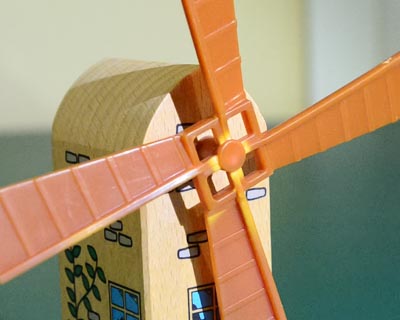
And the after:
Fabricating plastic parts
This is one area where you are almost certainly out of luck, and your best bet is to salvage the parts you need from another damaged or worn toy.
Theoretically, 3-D printers make it possible to replace broken or missing plastic parts but the idea is far less practical than you might think. Assuming you can solve the problem of modeling the part you need in CAD software, there is a big difference between high-temperature injection-molded plastic and the layer-by-layer bonding technique used in printing. For one, the former is significantly more durable as it has even stength throughout the part, while the latter has laminate weakness between layers. A typical consumer 3-D printer also produces parts with a rough finish that requires post-processing with chemicals that can degrade the details on the part. Last, there is the matter of color-matching, which is next to impossible. Most printers have a limited set of spools in a fixed range of colors, and finding one that matches the dye used in the original, molded part is an unrealistic goal unless it is white or black.
So, while 3-D printing looks attractive, it’s really only a “last resort” option, and any 3-D printed replacement parts almost certainly should not be sold.
There are home injection molding machines that make it possible for the hobbyiest to create true, molded plastic parts. If you have access to a CNC milling machine and the technical ability to make a mold, and you can solve the color problem. then you could conceivably fabricate a replacement plastic part yourself. The cost, of course, would be significant since you would be building a one-time-use mold from some very specialized equipment.
Removing dents from wood
You can remove dents from wood by steaming them out. Just add a drop of water to the dent, cover it with a rag, and use an iron to create some steam. Note that this may be very difficult to do on small BRIO parts, so be careful not to burn yourself. If the part cannot be stabilized in some manner, you should not try this method.
Note that you might need to sand the surface to smooth it out after it dries.