Up until 2006, BRIO’s battery engines were all designed to run on a standard, replaceable AA battery. Once the battery died, you tossed it out and put in a new one, or if you were properly energy conscious you used rechargeable batteries and kept a stash of NiCds or NiMHs and a charger on hand. With the introduction of the 4WD Engine #33247 and the 8WD Engine #33249 BRIO offered an alternative approach to battery engines: a rechargeable battery pack and a charger were bundled with the engine, eliminating the need to replace batteries at all. When the engine’s battery died, you simply plugged the charger into the charging port and let it charge over night. Additional battery packs could be purchased and either charged for use as spares, or swapped in to replace the original battery pack when it reached the end of its life.
But what, exactly, is inside the rechargeable engines’ battery packs? Each engine has a custom-designed plastic pack that is completely sealed save for the charging port. To definitively answer the question of what is in there, you’d need to break open the pack. That’s something I may do in the future when I get bored, but for now I can make some reasonable guesses based on the specs that are on the label.
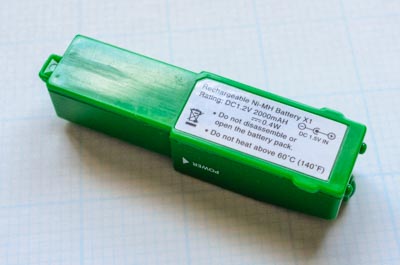
This pack is from the 8WD Engine #33249. The first thing to note is that the battery pack is a NiMH (nickel–metal hydride) battery rated at 1.2 V and 2000 maH. This was a very typical power rating for a high capacity AA NiMH battery in 2006. It stands to reason that this battery pack is really just a AA size NiMH battery with a charging port.
Charging NiMH batteries is actually quite complex due to their chemistry, and the small size of this battery pack suggests that it does not contain a sophisticated NiMH battery charging circuit. Hence, it’s reasonable to assume that the charger just uses the trickle-charge method, which is to send 0.05C to 0.1C into the battery. The trickle-charge method is a simple but very safe method of charging a NiMH cell because it guarantees that the battery will not heat up significantly, and also offers some protection against overcharge since most modern NiMH cells (including those made in 2006) can absorb a charge at this rate when full without incurring significant harm. The down side is that trickle-charging is very slow: at 0.05C a full charge takes 20 hours and at 0.1C it takes 10 hours. The power adapters provided with the BRIO engines are rated at 1.5V and 200 mA, so they provide a trickle-charge at 0.1C and the manuals state that a battery fully charges in about 8 hours (when the engine stops working, the battery is not completely drained, just low enough that the voltage drops off to the point where it can’t provide sufficient power).
This relatively simple charging method is not good for long-term battery life, though, especially if the battery is ever charged without being fully discharged. While it is possible that the power adapter/charger or the battery pack contains a shutoff timer circuit as an additional protection against overcharge, such a timer would only be of benefit to a fully discharged battery. Parents (or children) who got into the bad habit of continually charging their engine when not in use would soon find themselves with a dead battery that would no longer hold a charge. This probably explains the number of negative reviews at sites like Amazon which complain about the battery not lasting very long on a full charge or wearing out after frequent use.
A worn out battery pack could probably be revived by being hooked up to an intelligent charger and run through a refresh or break-in cycle. The challenge here would be connecting the pack to a charger designed for standard AA or AAA batteries. (Edited to add: You want to hook up directly to the battery’s contacts on top of the pack, not go in through the charging port which might have a current limiter and other circuitry in between it and the cell.)
A completely dead battery pack could likely be “repaired” by just opening it up and replacing the battery with an off-the-shelf AA NiMH, though that might require some jury-rigging of the insides since sealed battery packs often times have leads soldered directly to the battery terminals. The upside to doing this, though, is that you could take advantage of newer, higher-capacity NiMH batteries that also hold their charge when not in use, and do so in a manner that lets you pull out the battery for recharging in an intelligent charger with independent charge circuits (so that you aren’t forced to charge batteries in pairs).
Edit: 4/15/16
Reader Andrew J. opened up his pack and posted a photo online. Thank you for sharing, Andrew! As I suspected, the battery pack is just a 2000mAh NiMH battery with some circuitry (perhaps a simple voltage regulator).
Has anyone tried to break the battery pack open & replace the original battery? I tried a sharp knife, but the pack was glued pretty tightly so I gave up. Didn’t want to break it before knowing someone has succeeded in it… 🙂
I haven’t gotten one open yet, but I have not spent a lot of time on it. My experience matches yours: the glue/cement that holds it shut is pretty solid. This should make parents feel better about the child safety aspect of the battery pack, but it is not great news for those of us who want to look inside. 🙂
Can anyone recommend a third-party charger that will work with the battery pack shown above? We lost the one that came with one of our Brio trains in a move and I’m in search of a replacement (Brio does not sell them, unfortunately).
I have searched for replacement charger/power supply options but haven’t had any luck finding anything that outputs a reliable 1.5 V. I have, however, successfully charged these battery packs by direct wiring the contacts on the top of the battery pack to a real NiMH battery charger using alligator clips. The challenge is attaching wires to those contact points such that they’ll stay and maintain good contact for a few hours while charging. It’s obviously a jury-rigged and unpleasant solution, but it works. And using a real charger will charge the battery faster (and probably improve its life, too).
Hi John M, what sort of battery charger did you use. I have this little brio engine with no battery charger and we are trying all sorts to get it to work. My husband is now trying to attach the terminals to an AA battery, but would really like to know where to buy a 1.5v battery charger with small enough port at the end to go into the engine. All mobile phone chargers are too high a voltage. I have tried Brio and toy shops and amazon in germany but not sure where to go now. Any help from anyone would be appreciated on how to charge this battery. Thanks angela
I made a dummy “battery” by putting a screw in each end of a 1/2″ diameter wooden dowel pin, which I placed in the battery charger. I attached the alligator clips to the screws. Quite literally any NiMH battery charger will work, but I used a Powerex MH-C9000 charger. Less expensive chargers will work, though, as long as they have independant charging circuits (i.e. they will charge one battery at a time, instead of requiring you to charge batteries in pairs) but the nicer chargers have reconditioning modes that will extend the life of the battery. If I get some time this week, I’ll write an article about how I did this with some photos.
For those who are interested, I managed to get the enclosure open by cutting carefully along the edge with an exacto knife. Pics of the insides can be found here- https://goo.gl/photos/ZotVUnNNPzf3QDPF9
I paid way more than I should have for this engine because of the promise that the 8WD would actually be able to climb rising tracks without getting stuck. My time with it lasted all of 7 hours after unboxing as the stock battery refused the trickle charge. The Amazon reseller was very good about trying to help but the best they could do was track down a replacement battery in Spain which could only be shipped by sea!
After getting the enclosure open, I ended up soldering in some standard battery contacts so I can now just simply swap out a rechargeable AA when I need to.
Once the engine was up and running again another major design flaw appeared in the weak coupler magnet, which is much smaller than other Brio engines. So even if the 8WD allows it to climb hills on its own, the coupler ends up losing any cars anyway. So I opened up the bottom trucks this time and replaced the coupler with a much stronger magnet.
Now after some messing around with various coupling arrangements to ensure the best weight ratio going up hills, it finally lives up to everything I had hoped. A truly hands free engine!
Thanks for the photo, Andrew! It’s nice to see what’s inside the package. It really is a great engine, despite the flaws you point out, though it sounds like your upgrade on the magnet really helps out.
I found a non-operating one of these in a pile of brio stuff passed on to my grandchildren. I cut the green pack open as Andrew J did above, but I removed all the insides. I bought a single AA battery holder and trimmed it to fit into the green pack and wired its contacts directly to the two slide contacts on the top of the pack. The battery plus pack is obviously deeper than the original sealed cell, so I discarded the flat “lid” of the green pack and simply push the new battery and holder into the top then slide the whole thing into the loco. It works fine, so iI now have a loco which will run on any standard or rechargeable AA battery, and changing it is quick and easy.
Do you have a picture of that?
I’m having the same issue with a battery,
Je recherche : rechargeable Ni-MH batterie X 1 pour train Brio où trouver . Merci réponse en français .
Vous pouvez les trouver sur eBay à l’occasion.
Thank you so much guys!
I bought three engines ten years ago for my first kid.
I was hesitating to throw everything. I just opened as described and replaced the battery and they’re back to life!
Has anyone tried running brio engines at higher voltage? I am thinking about using a lithium power pack (~3.6v).
Wow, thank you a lot!! I just opened as described, removed the old one NiMH battery and put an ordinary AA battery . Now it works. So easy.
Maybe someone is able to create a 3D printable replacement model?
My 2 bullet locomotives must be vintage. They require 2 sets of button batteries. Anyone know the size? Appear to be near AG33 or LR44.