To discourage disassembly by curious toddlers, modern BRIO toys use screws with a triangular head. This is great for preventing accidents with your child, but not so friendly for you whether you are trying to repair something or are just curious what’s inside. The answer is to get the right tools for the job: triangular head screwdrivers, which you can find on Amazon and eBay. I’ve found that most of the BRIO screws are a TA23, but get an assortment to be safe.
Blue Steam Engine restored
I just finished a project to restore my very ragged #33429 Blue Steam Engine, which I first wrote about back in December. Here’s what it looked like when I received it:
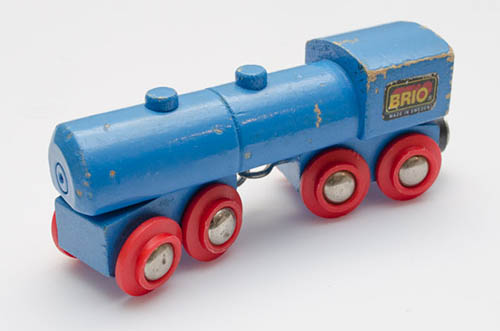
And this is what it looks like now:

I documented every step of the process and will be writing an article on what I did very soon for those who are curious and may want to experiment with restoring their own pieces. It was a very long and at times tedious project but it was absolutely worth it in the end!
Paint-matching the BRIO blue
I’ve been experimenting with blue lacquer paints, and right now the Tamiya French Blue (TS-10) is looking pretty good as a match for the BRIO light blue. The only down side is that the Timiya paints are made for plastic so they are very thin sprays. You have to apply several coats to achieve the right depth of color.
Removing stress lines from plastic parts
In general plastic is pretty durable, but some BRIO accessories have large plastic parts that are easily damaged. Good examples of this are the BRIO #33382 Windmill and the Thomas the Tank Engine and Friends #32481 Windmill: their large, plastic sails are quite delicate and easily bent, not just with handling but also in storage because of their awkward shape and lack of support. When plastic bends or is stressed severely enough it lightens in color, creating unsightly lines where the damage occurred.
These stress lines can be partially, or even entirely, removed from the surface of the plastic using heat, and the following video shows the technique employed on a #33382 Windmill. Here’s the before image:
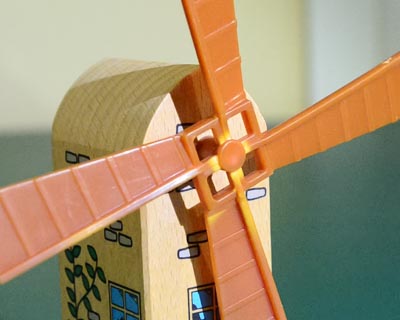
And the after:
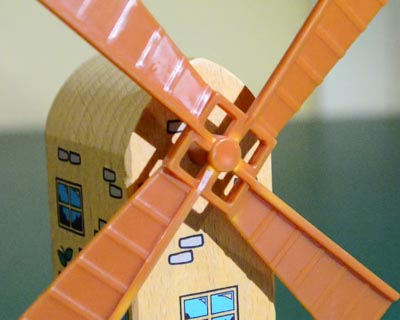
If you don’t want to watch the whole three-and-a-half minute video and just want to see the proof that it works, the changes start happening around around 1:45.
Here’s the basic approach. To do this you will need a small heat gun such as the kind used for embossing in crafting projects. A hair drier shoould work as well, but they don’t get as hot so it will take longer. Hold your heat gun a few inches from the plastic and turn it on. Heat the plastic surface gently, watching the surface carefully. You want the plastic to get warm enough that the surface becomes shiny and the plastic softens but does not melt. The stress lines should start disappearing before your eyes.
Be very careful not to melt the plastic. You may need to back off and let the part cool down for a while and then return to it if the damaged area is very large or the stress lines are particularly deep.
Also be careful not to deform your piece. Getting it warm enough to remove these lines also makes it soft enough to bend and warp. Handle your part with care until it cools down.
A look at battery packs in BRIO rechargeable engines
Up until 2006, BRIO’s battery engines were all designed to run on a standard, replaceable AA battery. Once the battery died, you tossed it out and put in a new one, or if you were properly energy conscious you used rechargeable batteries and kept a stash of NiCds or NiMHs and a charger on hand. With the introduction of the 4WD Engine #33247 and the 8WD Engine #33249 BRIO offered an alternative approach to battery engines: a rechargeable battery pack and a charger were bundled with the engine, eliminating the need to replace batteries at all. When the engine’s battery died, you simply plugged the charger into the charging port and let it charge over night. Additional battery packs could be purchased and either charged for use as spares, or swapped in to replace the original battery pack when it reached the end of its life.
But what, exactly, is inside the rechargeable engines’ battery packs? Each engine has a custom-designed plastic pack that is completely sealed save for the charging port. To definitively answer the question of what is in there, you’d need to break open the pack. That’s something I may do in the future when I get bored, but for now I can make some reasonable guesses based on the specs that are on the label.
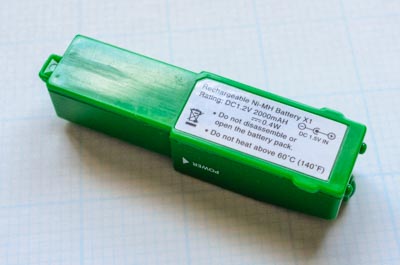
This pack is from the 8WD Engine #33249. The first thing to note is that the battery pack is a NiMH (nickel–metal hydride) battery rated at 1.2 V and 2000 maH. This was a very typical power rating for a high capacity AA NiMH battery in 2006. It stands to reason that this battery pack is really just a AA size NiMH battery with a charging port.
Charging NiMH batteries is actually quite complex due to their chemistry, and the small size of this battery pack suggests that it does not contain a sophisticated NiMH battery charging circuit. Hence, it’s reasonable to assume that the charger just uses the trickle-charge method, which is to send 0.05C to 0.1C into the battery. The trickle-charge method is a simple but very safe method of charging a NiMH cell because it guarantees that the battery will not heat up significantly, and also offers some protection against overcharge since most modern NiMH cells (including those made in 2006) can absorb a charge at this rate when full without incurring significant harm. The down side is that trickle-charging is very slow: at 0.05C a full charge takes 20 hours and at 0.1C it takes 10 hours. The power adapters provided with the BRIO engines are rated at 1.5V and 200 mA, so they provide a trickle-charge at 0.1C and the manuals state that a battery fully charges in about 8 hours (when the engine stops working, the battery is not completely drained, just low enough that the voltage drops off to the point where it can’t provide sufficient power).
This relatively simple charging method is not good for long-term battery life, though, especially if the battery is ever charged without being fully discharged. While it is possible that the power adapter/charger or the battery pack contains a shutoff timer circuit as an additional protection against overcharge, such a timer would only be of benefit to a fully discharged battery. Parents (or children) who got into the bad habit of continually charging their engine when not in use would soon find themselves with a dead battery that would no longer hold a charge. This probably explains the number of negative reviews at sites like Amazon which complain about the battery not lasting very long on a full charge or wearing out after frequent use.
A worn out battery pack could probably be revived by being hooked up to an intelligent charger and run through a refresh or break-in cycle. The challenge here would be connecting the pack to a charger designed for standard AA or AAA batteries. (Edited to add: You want to hook up directly to the battery’s contacts on top of the pack, not go in through the charging port which might have a current limiter and other circuitry in between it and the cell.)
A completely dead battery pack could likely be “repaired” by just opening it up and replacing the battery with an off-the-shelf AA NiMH, though that might require some jury-rigging of the insides since sealed battery packs often times have leads soldered directly to the battery terminals. The upside to doing this, though, is that you could take advantage of newer, higher-capacity NiMH batteries that also hold their charge when not in use, and do so in a manner that lets you pull out the battery for recharging in an intelligent charger with independent charge circuits (so that you aren’t forced to charge batteries in pairs).
Edit: 4/15/16
Reader Andrew J. opened up his pack and posted a photo online. Thank you for sharing, Andrew! As I suspected, the battery pack is just a 2000mAh NiMH battery with some circuitry (perhaps a simple voltage regulator).
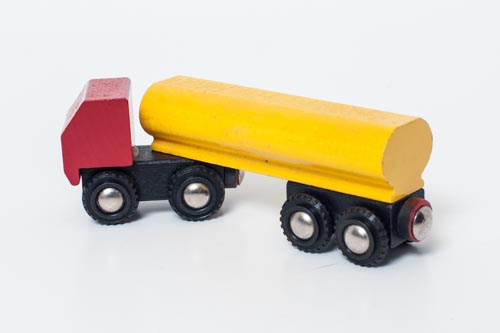
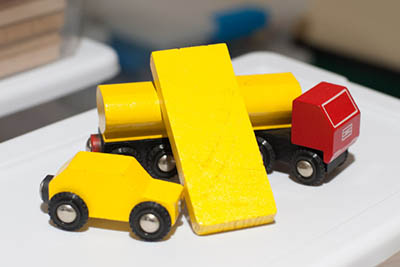
Restoring the gas tanker truck from #33533
I acquired a #33533 Gas Station set whose yellow tanker had definitely seen better days. When I got it, the paint was chipped along the edges, worn in several places, and had completely lost its sheen. My goal was to restore it to it’s former glory, using the Testors Model Masters Spray Lacquer in Chrysler Yellow.
The first step was to lightly sand the finish to prepare it for the fresh paint layer. I didn’t want to take the paint all the way off since there was plenty of paint there that could serve as a base for the fresh coat, but rather the remove any dirt and smooth out any rough spots so that I’d have a nice, smooth finish when I was done.
The sanded tanker is shown below. Note that even with my light sanding, there are still some significant rough spots in the tanker’s finish. This piece had definitely seen some rough play.
Next up was masking off the wheels. This was delicate work, since I had to get tape between the wheel and the undercarriage along the top edge where it meets the tanker body. I had to tear the tape into thin strips to have something narrow enough to fit between the axel and the tanker body to form a nice line here. Then I used more tape to completely enclose the wheel assembly. I recommend using ScotchBlue painters tape for delicate surfaces since it has a milder adhesive than regular masking tape, which will prevents damage to existing finishes. It comes in three widths and I find all are handy to have.
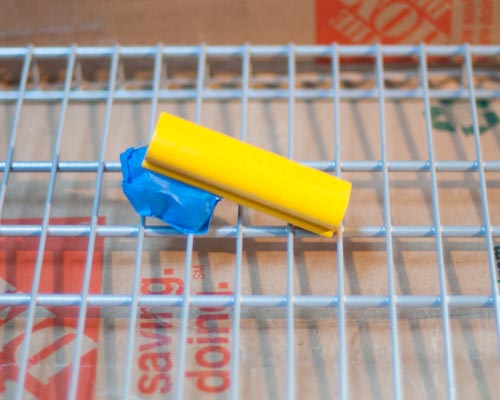
For spraying, I placed the part on a grill so that it was not resting directly on the ground. This not only prevented paint drips from pooling around the edges, but also provided extra airflow for drying. My grill was just a scrap piece of wire shelving, left over from a shelving installation in the garage.
The Model Masters spray lacquer is a fairly thick paint, but it applies in nice, even coats. The tanker, like most BRIO parts, is a fairly small target relatively speaking so I held the can fairly close—about 6 to 8 inches away—and applied the paint with smooth but brisk strokes. I used three passes, allowed the paint to dry for a few minutes, and then repeated. After the second set of coats had dried to the touch, I turned the part around and repeated the procedure on the other side. Then I let the part dry over night before spraying the underside, since this meant turning the tanker on its back. The paint does not really start to cure for a few hours, so doing this too soon would have marred the new finish.
The Model Masters custom lacquer system is a two-part paint system, consisting of both a base coat and a clear coat. The clear coat must be applied within 24 hours in order to properly bond with the paint layer. I found that the paint layer has sufficient gloss to it that it was not necessary to add a clear coat, so I left it as-is.
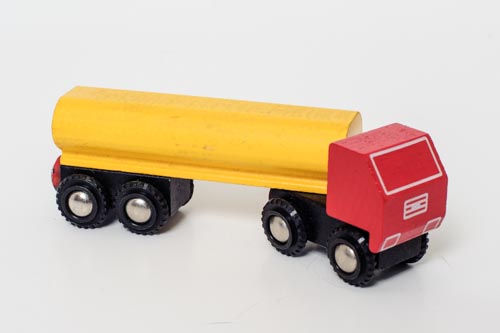
Here’s the finished truck:


The paint finish has a nice sheen and looks clean and smooth. The paint did not perfectly flow into the grooves (which I did not clean very well), but by and large the tanker looks significantly better than it did before. The formerly chipped edges are a slightly thinner yellow than the rest of the body since I did not do a “proper” paint fill—filling paint chips correctly is a laborious and time consuming process involving slowly filling the chip to build up the paint layer, sanding, and then refinishing—but they are good enough.
The next step is patience. Paints dry in hours, but take days to fully cure. During the curing process, the solvents in the paint evaporate and the paint layer hardens, forming the wear-resistant finish. Exactly how long it can take for paint to hard-cure varies with temperature, humidity, and the number of layers of paint that have been applied, but as a general rule you should allow 30 days for the process. This is especially important if you intend for children to play with the refinished toy: paints are not safe for toddlers until the solvents have evaporated.
Testor’s spray lacquers are safe for use on toys
Earlier last week I wrote about one lacquer paint option for restoring the BRIO yellow finish, using the Testors Model Masters paint line. I contacted Testors, who is owned by Rust-Oleum, and asked about the child safety of their paint line. Their response is below.
The short of it is, the paints are safe once they have cured. You should wait for 30 days before selling a toy that has been repainted or allowing a toddler to play with it.
Subject: Re: Paint [#91058]
Date: Wed, 10 Sep 2014 15:02:07 +0000 (GMT)
From: ROProductSupport <roproductsupport@rustoleum.com>
Reply-To: roproductsupport@rustoleum.comJohn,
Thank you for contacting Rust-Oleum Product Support.
Rust-Oleum® paints are unleaded and safe for use on toys and furniture. The cautions on the cans refer to the liquid form of the paint and are driven by the solvents in the paint. Once the paint is fully cured, the solvents have evaporated and are no longer in the coating; the remaining coating is a combination of solids made of pigments and additives bound by the resin and can be considered non-hazardous.
Thanks,
Reggie
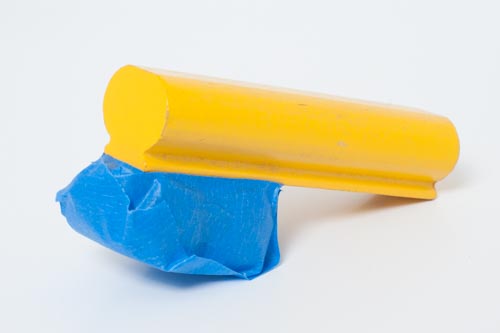
Matching the BRIO yellow paint
The below is a photo of a wooden block painted with the Testors Model Masters spray lacquer #28104 Chrysler Yellow PY3. As you can see, it is an extraordinarily close match for the various shades of yellow BRIO has used over the years. The angle of the wooden block with respect to the camera makes it look a little brighter and lighter than it really is so it is even closer in appearance in person.
The Model Masters paint is technically a two-step process, meaning you should finish it with a clear coat after you are done. At one point Testors made numerous finishes in the Model Masters line, but now appears only to produce a high gloss top coat. Any spray lacquer clear coat should work.
In the next couple of days I’ll be restoring the finish on an old gas tanker truck that has seen better days using this paint and will share the process here.
WARNING! This is a solvent-based lacquer paint that may not be appropriate for toddler toys. At the very least, the finish should cure for 30 days until it hardens completely before being handled by young children.
EDIT: According to Rust-Oleum, this paint is safe for childrens toys once it has cured.
Replacing those missing smokestacks
Without a doubt, you are familiar with the BRIO #33374 Town set.

This set has a rather long history, dating all the way back to the very early 1960’s at least with multiple variations, though it is the 80’s vintage set shown above is the one most familiar to BRIO enthusiasts today. It shows up on eBay fairly regularly both individually and as a part of lots, and I’d say about four out of every five of these is missing its smokestack.
Missing pieces are always frustrating, especially for products that went out of production over two decades ago. One of the primary means of replacing missing parts is, of course, to use two partial sets to build a single complete one, but what do you do when the piece you need is the one that is most commonly absent? And such a tiny piece at that?
In lieu of actual replacement parts, the answer is to replace them yourself. The smokestack from #33374 is really just a 12mm x 60mm wooden dowel, painted black.
###Finding a dowel
As shown in the photo below, BRIO was at one point using fluted dowel pins for this purpose, with a sort of diagonal cut to the grooves.
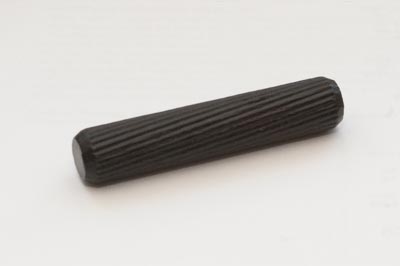
If you are in the U.S., where Imperial measurements are still the norm, it’s going to be a challenge to find a metric dowel pin with these exact specifications (I know: I’ve looked, and the best I’ve been able to do is 12mm x 40mm and 12mm x 100mm), and even harder to find one with this groove pattern. What you can do is find dowels pins in either a 7/16″ diameter, which are a little too narrow, or a 1/2″ diameter, which are a little too wide, with a 2-1/4″ or 2-1/2″ length. Personally, I’d go with the 1/2″ diameter since the hole for the smokestack in the factory is actually bored out to 13mm, which is wide enough to accept a 1/2″ pin. You might even be able to find a 15/32″ dowel rod, which you can cut to length yourself, though of course it won’t be grooved.
If you live in the part of the world that uses metric measurements–basically anywhere other than the U.S.–a 12mm x 60mm dowel pin should be an easy find. The grooves? Not so much. Sometimes, though, especially when you are trying to replace parts that no longer exist, you have to just give in and accept that “close enough” is close enough.
###Are the grooves even necessary?
Probably not. As shown in the box photo below, BRIO didn’t always use fluted dowel pins:
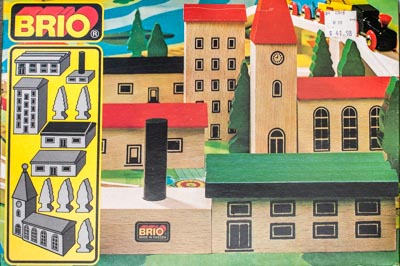
So, there’s plenty of precedent for a smooth dowel without beveling around the edges. This, frankly, makes the search for a replacement smokestack even easier, since any dowel rod of the appropriate diameter and cut to length will do.
So don’t despiar if your Town set is missing its smokestack. Grab yourself an appropriately sized dowel pin, or a dowel rod and trim it to length, and paint it black with a black lacquer paint. In no time flat, you’ll have a newly complete Town set!
###Resources
- Rust-Oleum 1905830 Lacquer Spray, Black, 11-Ounce
- Krylon 7030 Lacquer Spray Paint Gloss Black, 12-Ounce Aerosol
Warning! These spray lacquers are solvent-based paints that may not be suitable for toddler toys. At the very least, the paint should be allowed to cure for 30 days so that the solvents fully evaporate before being handled by young children.
EDIT: According to Rust-Oleum, their paints are safe for children’s toys once they have cured.